

How To Backup Iphone Photos To Pc Windows 10
If yous're wanting to know how to transfer photos from iPhone to PC or Mac, you have lots of options. There are more ways to motion photos from iPhone to Mac but because they're both Apple devices, only the transfer of iPhone photos to PC is non every bit complex equally y'all might remember. Nosotros'll testify you how to get photos off iPhone and onto a computer easily!
Related: What Is iCloud & How Does It Work? Apple tree iCloud Basics
Bound To:
- How to Transfer Photos from iPhone to Computer (Mac)
- How to Transfer Photos from iPhone to Mac in MacOS Catalina & Later
- How To Import Photos from iPhone to Mac in MacOS Mojave
- How to Transfer Photos from iPhone to PC
- How to Import Photos from iPhone to PC (Culling Method)
- How to Import Photos from iPhone to Mac with iCloud Photograph Stream
- How to Download Pictures from iPhone to Calculator with iCloud Photos
- How to Import Photos Using AirDrop on Mac
How to Transfer Photos from iPhone to Computer (Mac)
The classic manner to transfer photos from iPhone to Mac is to apply the photograph transfer feature in the Photos app that both Mac and PC offer. It's important to note that the import Photos from iPhone to Mac procedure has changed a little since MacOS Catalina, Big Sur,and soon macOS Monterey, so if you're using a newer operating arrangement you'll want to use the method shown next. If you use Mojave or earlier, you tin can skip to the next section.
How to Transfer Photos from iPhone to Mac in MacOS Catalina & Later
- Connect your iPhone to your Mac with the USB cable and unlock your iPhone.
- Open the Photos app on your Mac. You can find it with Spotlight search, in your Dock, or by opening the Applications folder and selecting the Photos app.
- Your iPhone should already be selected in the browser on the left of the Photos page. If it isn't, then select your iPhone.
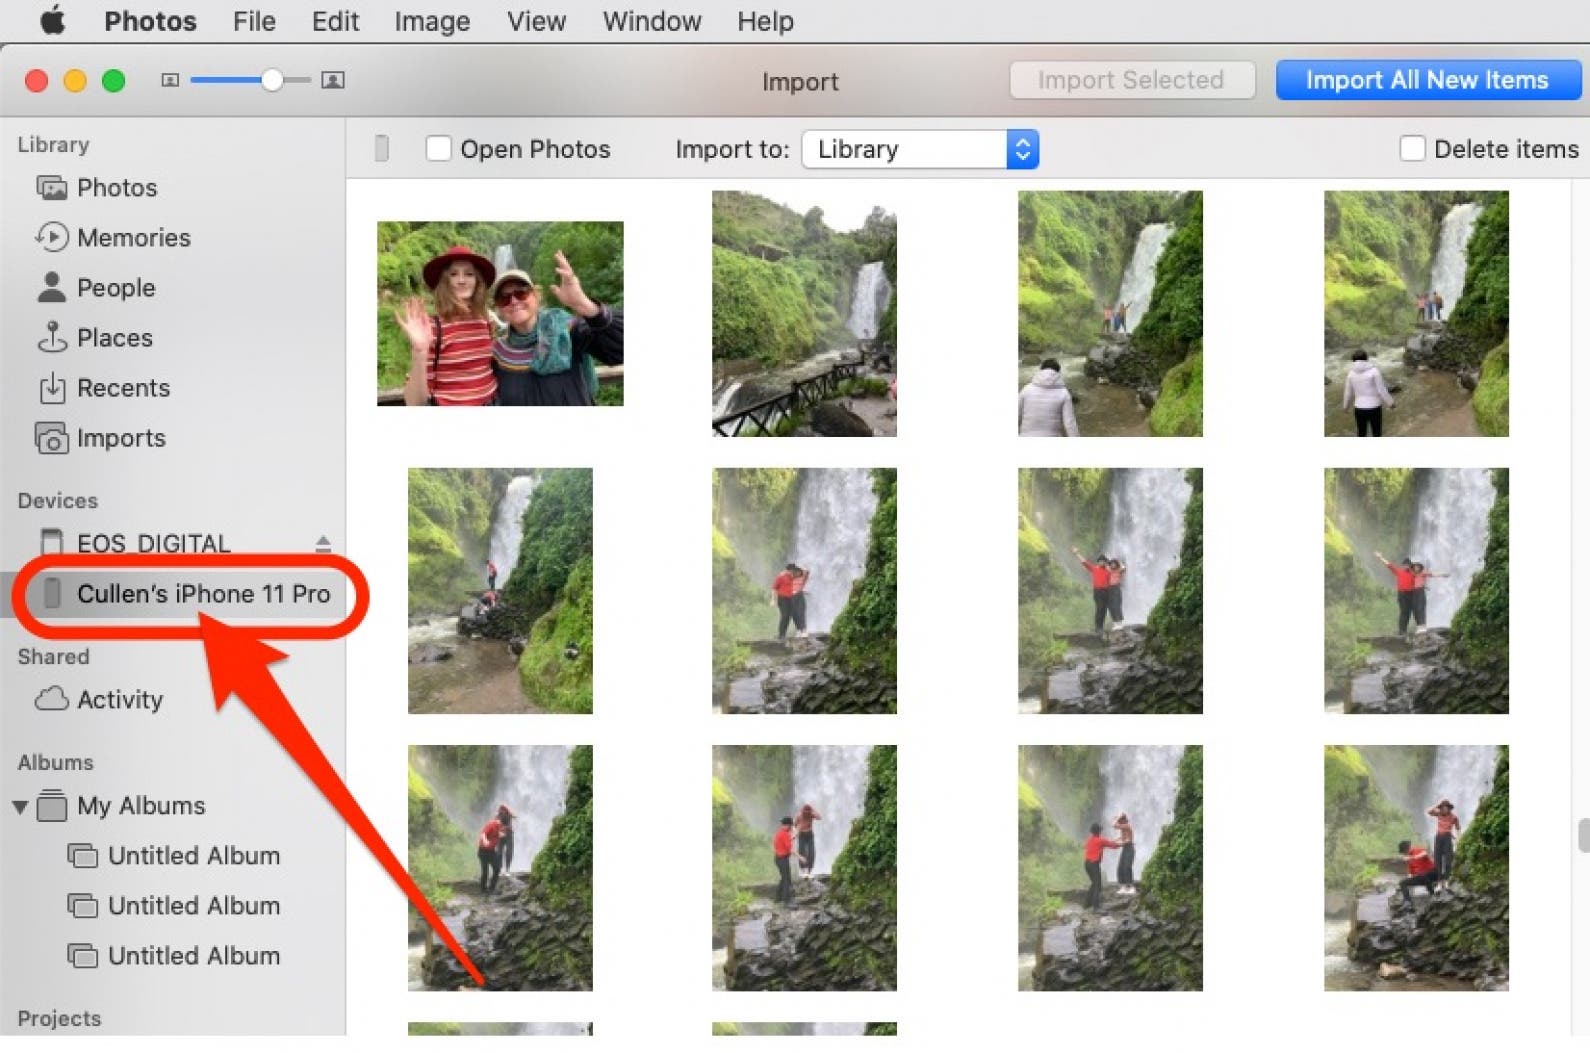
- Select the photos y'all wish to import by clicking on them.
- Click the Import button at the top.

That'southward it; Finder has fabricated this process easy! If you'd rather move photos from iPhone to Mac without a USB cable, you can also learn how to transfer photos from iPhone to Mac using AirDrop or iCloud Photo Stream. These methods are specially helpful if yous own a MacBook that doesn't have USB-A ports built in!
How To Import Photos from iPhone to Mac in MacOS Mojave
This method will help you transfer iPhone photos to a Mac or MacBook if you utilise the macOS Mojave operating organisation. If your device is compatible with the newest macOS version, nosotros always recommend keeping your device updated! This ensures that issues fixes, privacy updates, and new features are always available to you.
- Connect your iPhone to your computer with the USB cablevision.
- Open up the Photos app on your Mac. Y'all can find it with Spotlight search, in your Dock, or past opening the Applications folder and selecting the Photos app.
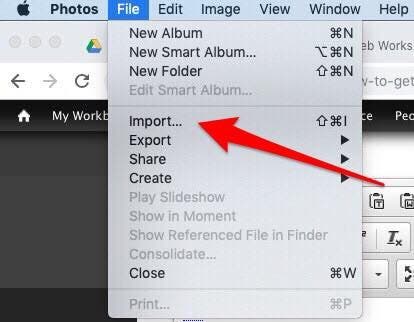
- Select File from the acme menu, then select Import.
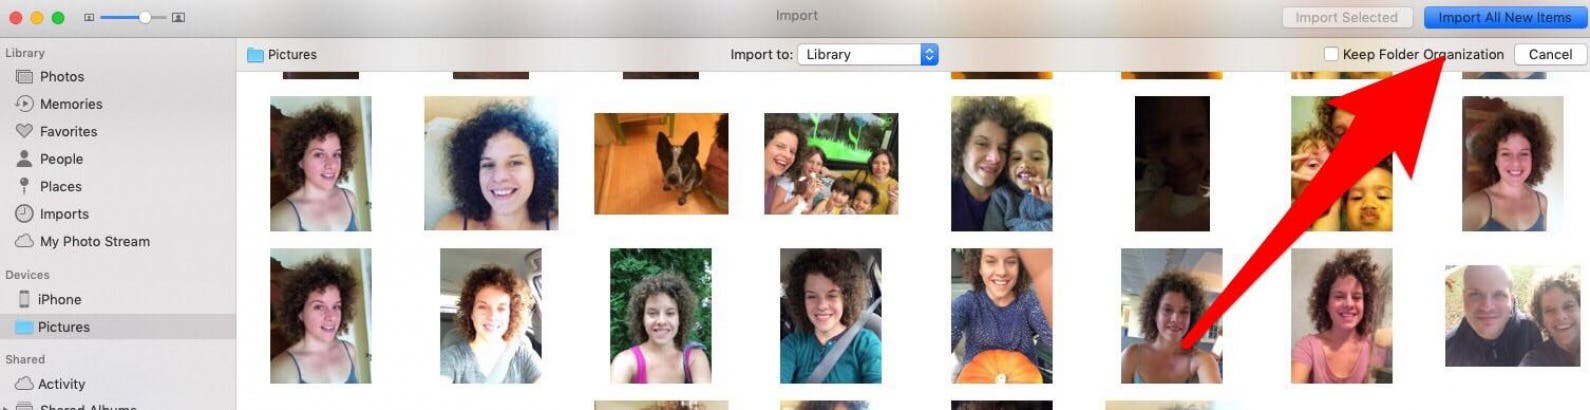
- Yous can download select photos by belongings down the command key (cmd) on your keyboard while clicking all the photos you want to transfer, then click Review for Import.
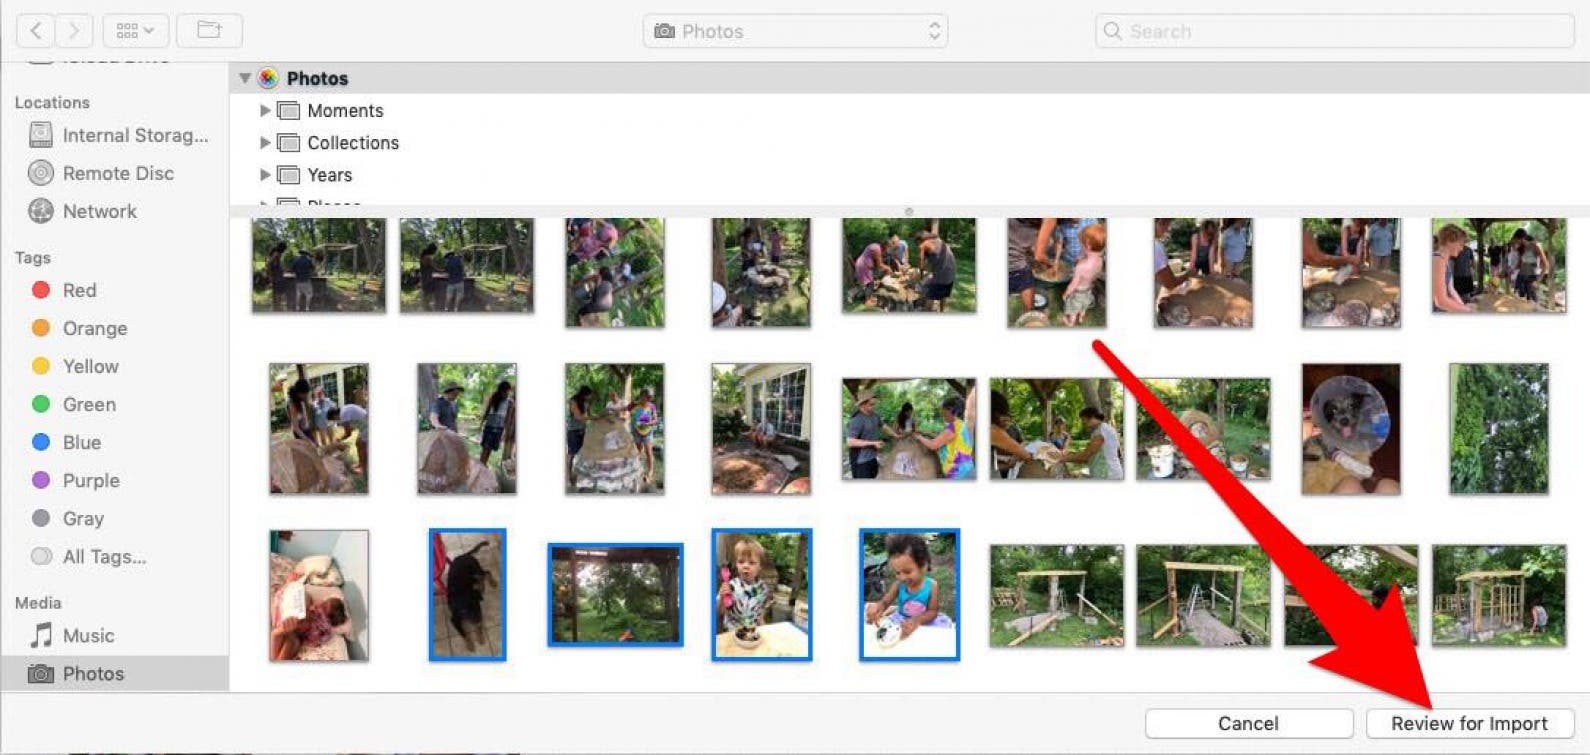
- If you lot've already imported some or all of your selected photos, your Mac will let you know and and then give y'all the option to import the remaining photo(s) past clicking Import New Photo.
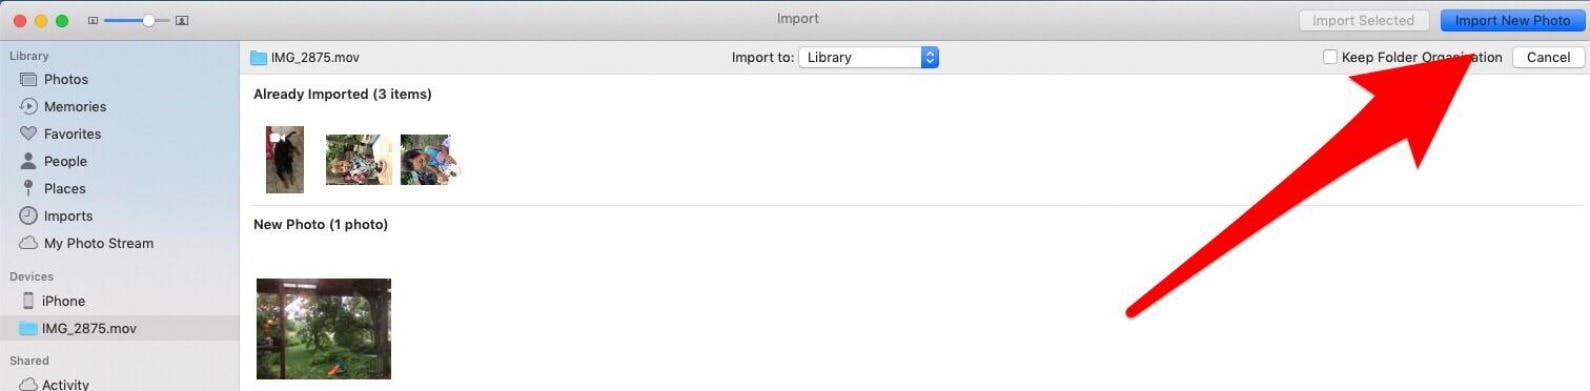
- If you'd rather import all the photos on your iPhone that y'all haven't previously backed up, click Import All New Items.
- To view the recently imported photos, select Last Import on the sidebar.
And y'all're done!If you'd rather transfer iPhone photos to Mac without a USB cable, you can also learn how to import photos from iPhone to MacBook or Mac using AirDrop or iCloud Photo Stream. These methods are especially helpful if you own a MacBook that doesn't have USB-A ports congenital in!
How to Transfer Photos from iPhone to PC
How to Upload Photos from iPhone to Computer in Windows 8
If y'all have a PC with an older version of Windows, Auto Play volition pop up when your iPhone is connected to your estimator with a USB cable. On a PC with Windows 8, your computer volition discover the device and provide a pop-up that says "Tap to cull what happens to this device." When you click on that pop-up, yous'll meet the Import Photos and Videos option to permit you to move photos and videos from iPhone to PC. The residue of the process should be pretty similar to what is demonstrated below for Windows x. When in dubiousness, look for the Import push button!
How to Import Photos from iPhone to PC in Windows 10
Below we'll show you how to transfer selected photos from iPhone to PC, or all photos.
- Plug your iPhone into your Windows computer with the USB cable.
- On your iPhone, a popular-up volition ask if you would like to let the computer to access the iPhone. Tap Let.
- On your Windows calculator, the Photos application may automatically launch. If information technology doesn't, launch the Photos programme using the Windows Start carte or search bar.
- Click the Import push in the upper-right corner of the Photos app.

- In the drop-down carte du jour, select From a USB device.
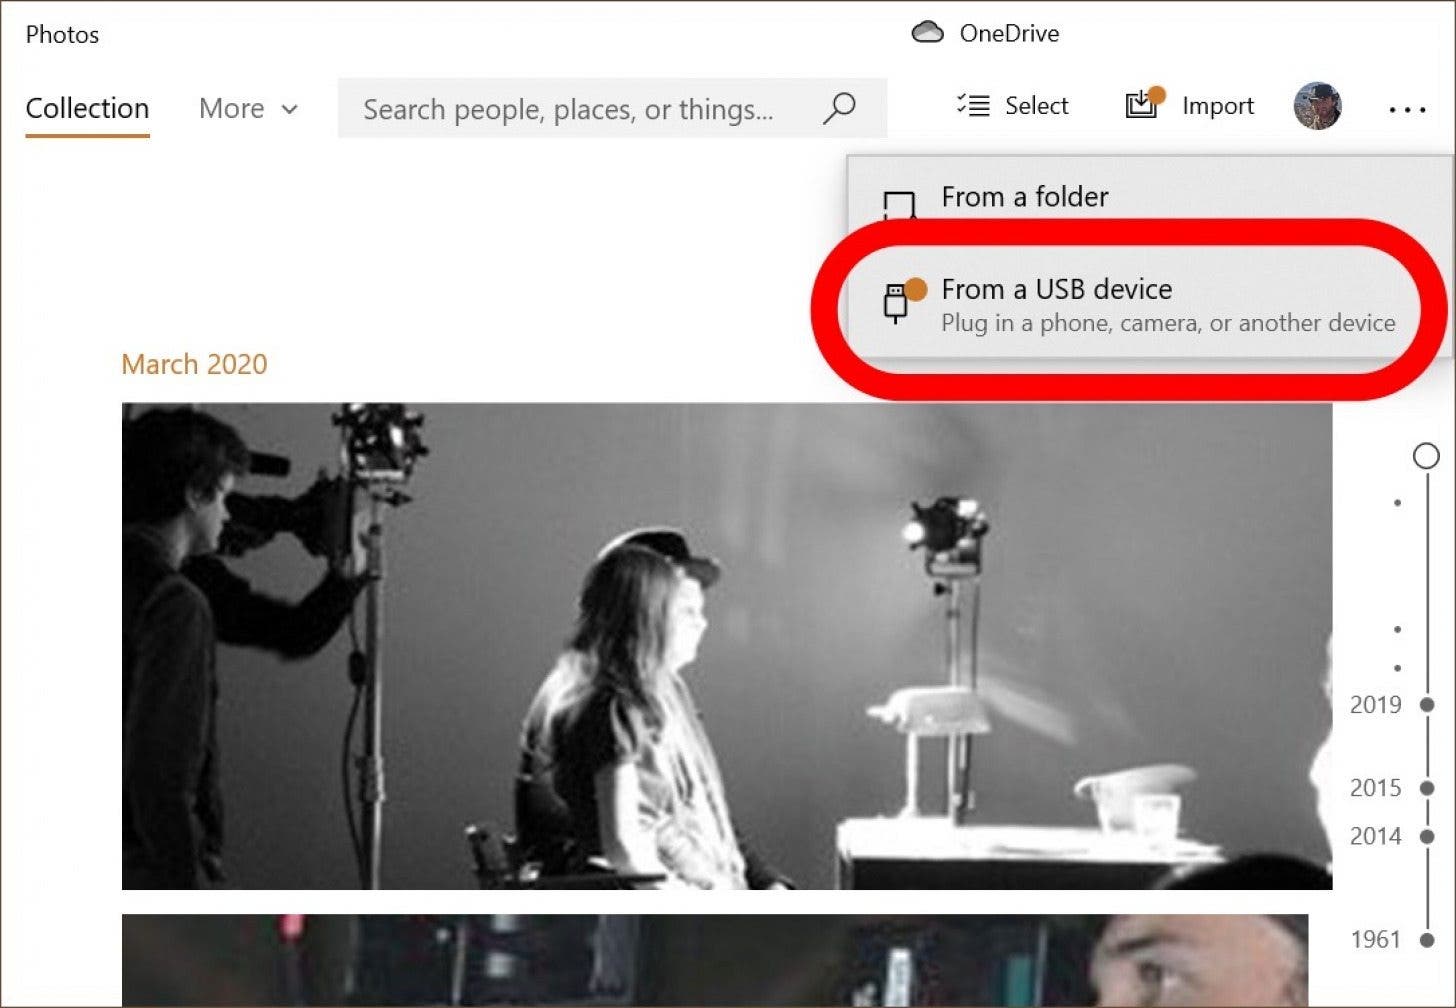
- If you have multiple USB devices plugged in to your PC, such as a thumb bulldoze, you'll exist asked to select which one y'all desire to import from. Select your iPhone.
- The computer volition search for photos to import, then a box with the new photos for transfer will pop-upwardly. If the Photos application crashes here, you lot may have a common bug. Try the alternating method listed in the next section.
- Select the photos y'all desire to import.
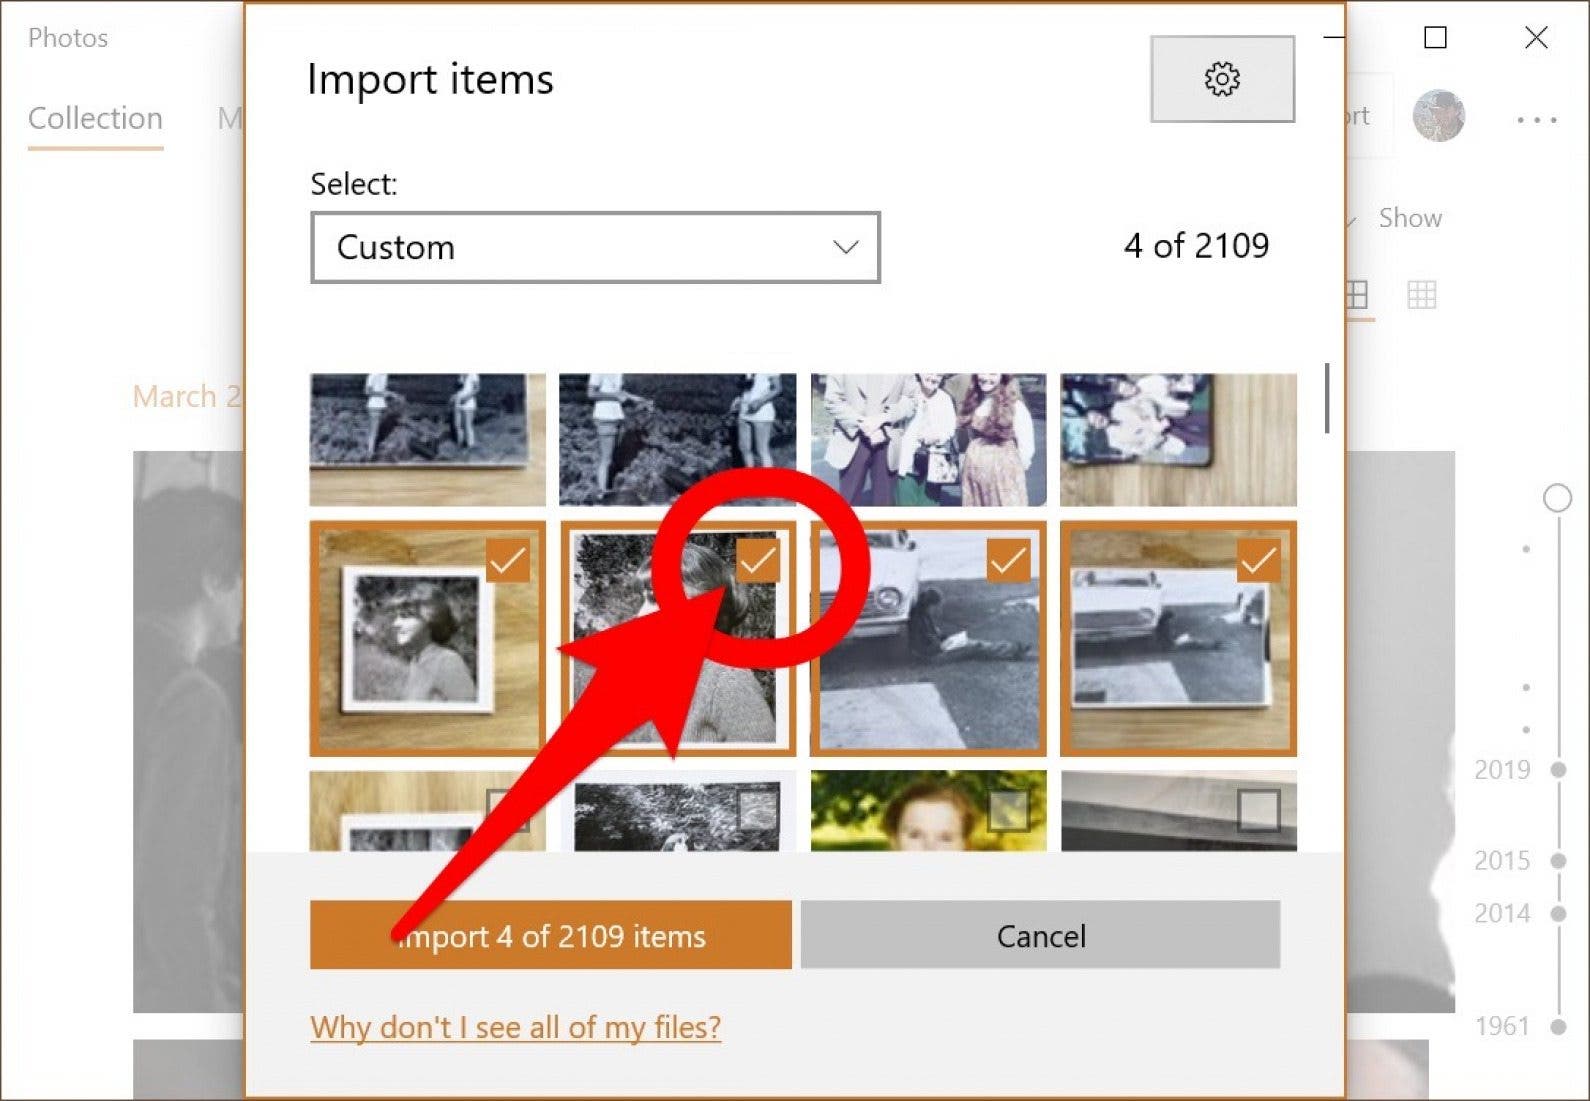
- To run across where the photos volition be saved and to modify that location, click settings, represented by a gear icon.
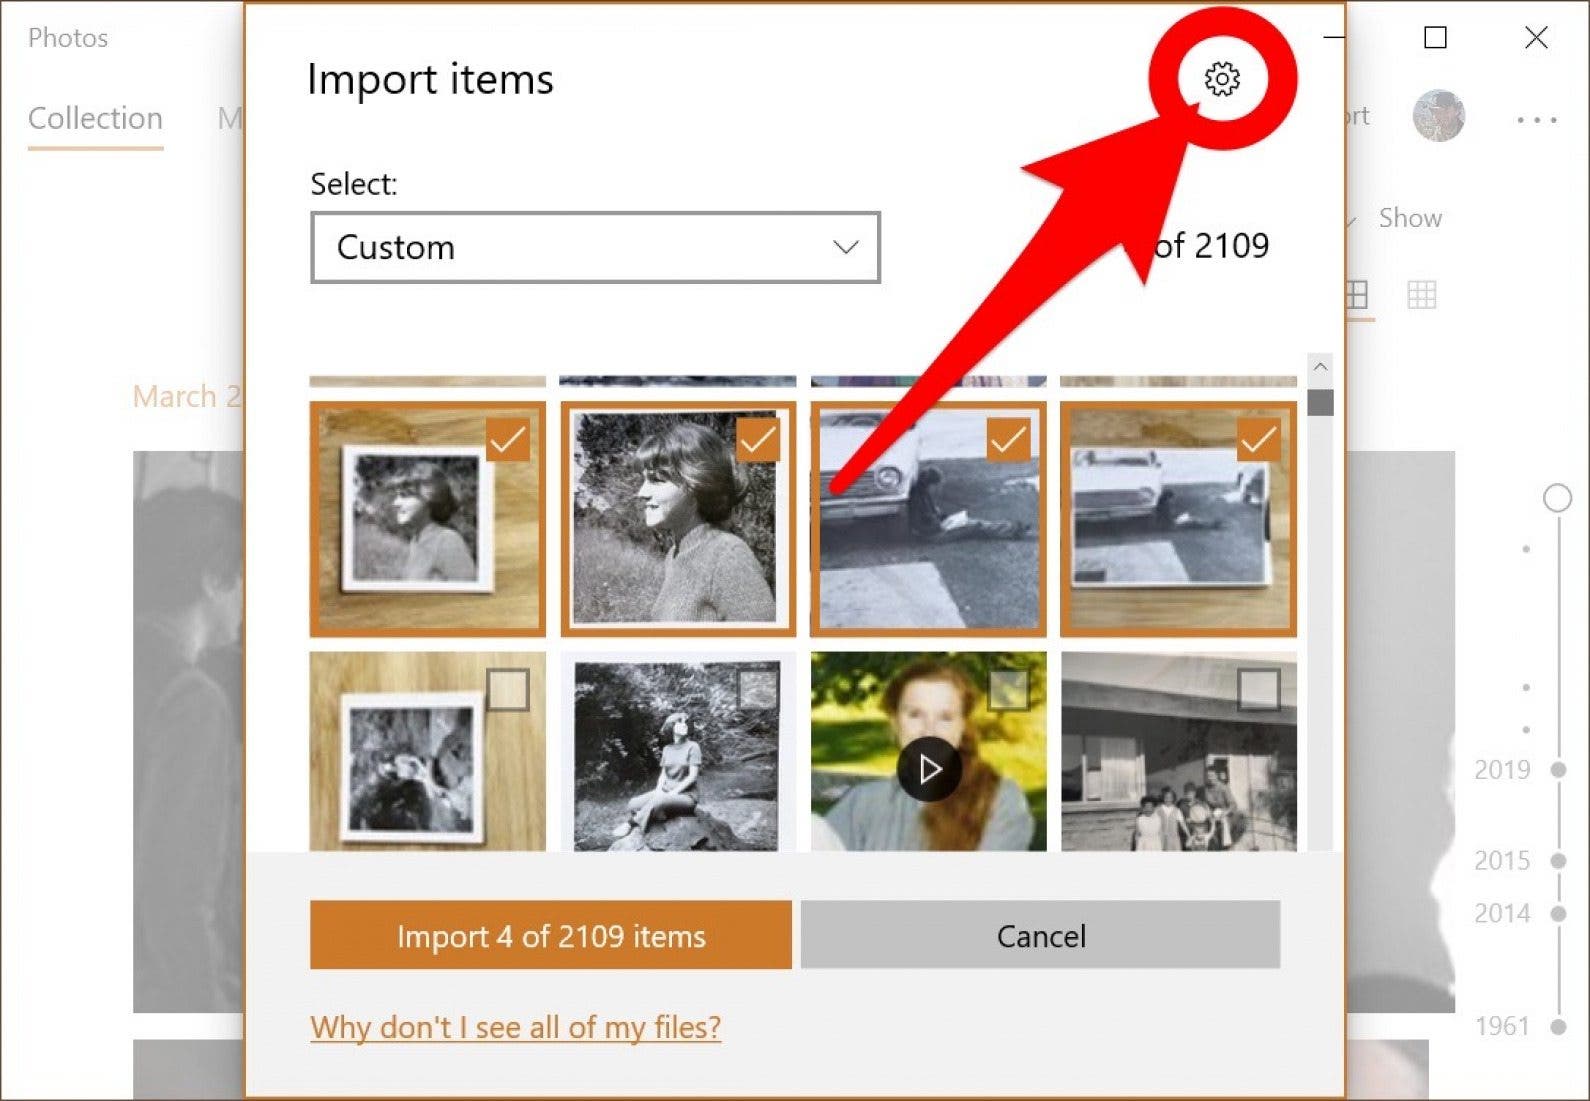
- In the import settings menu, you will see the location where the photos will exist saved plus a Change the import destination link in instance you want to change where imported iPhone photos are saved to your PC.
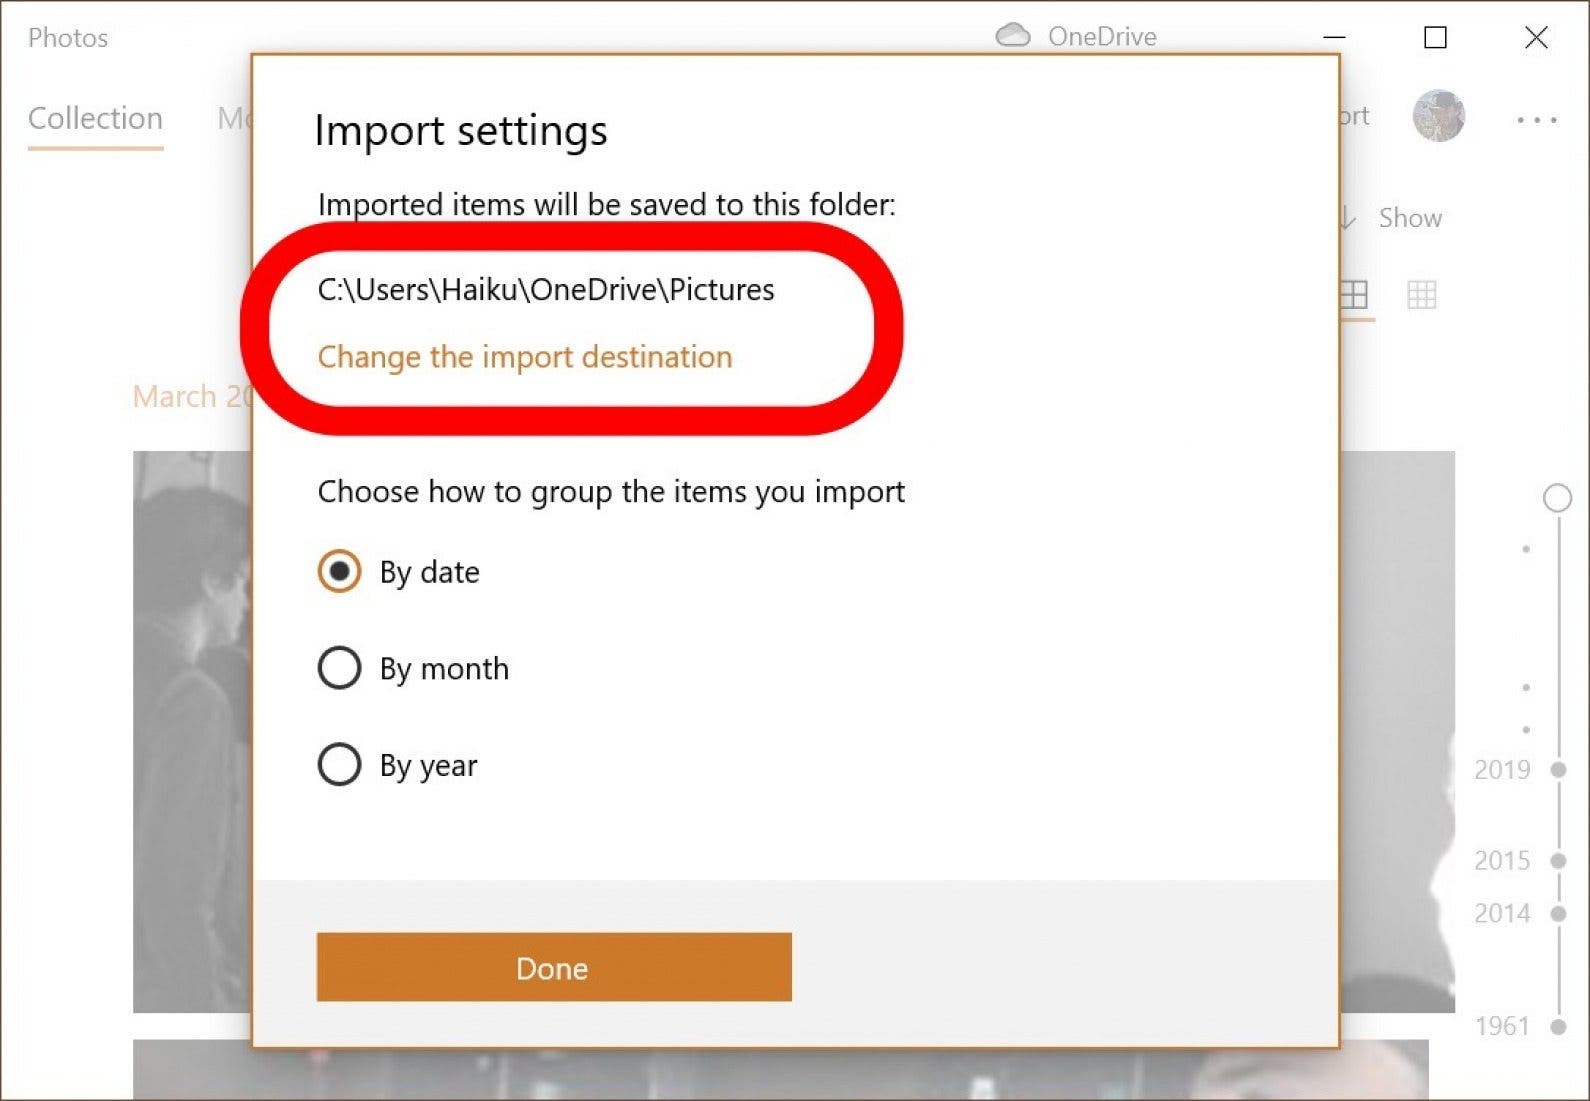
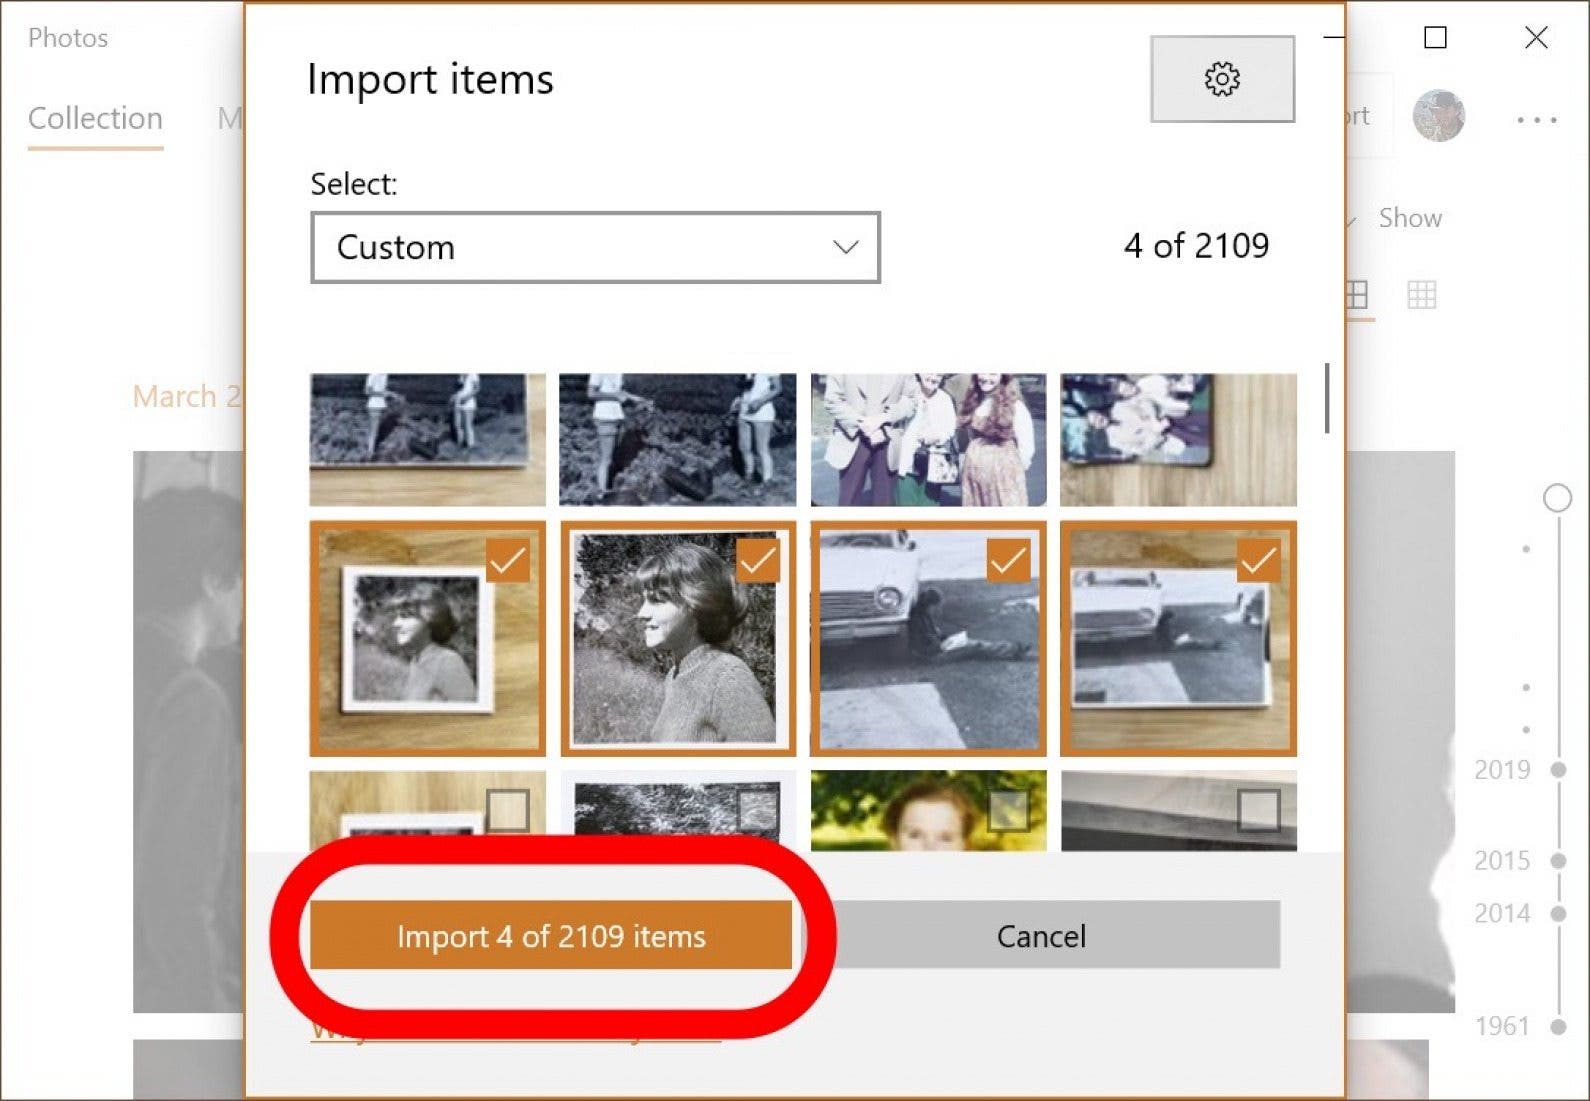
- Click Done to become back to the image-selection screen.
- In one case y'all've selected the images you want, click the Import push button.
- Once they're imported, yous tin can view the photos in the Collections menu of the Photos app or select the Album icon on the left sidebar to view specific albums.
How to Transfer Pictures from iPhone to Computer with a Cable (Alternative Method)
Some users encounter bugs with the built-in Windows Photos application. If you can't get it to work and need another solution, try this.
- Plug your iPhone into your Windows calculator with the cable, unlock the iPhone, and tap Allow, as above.
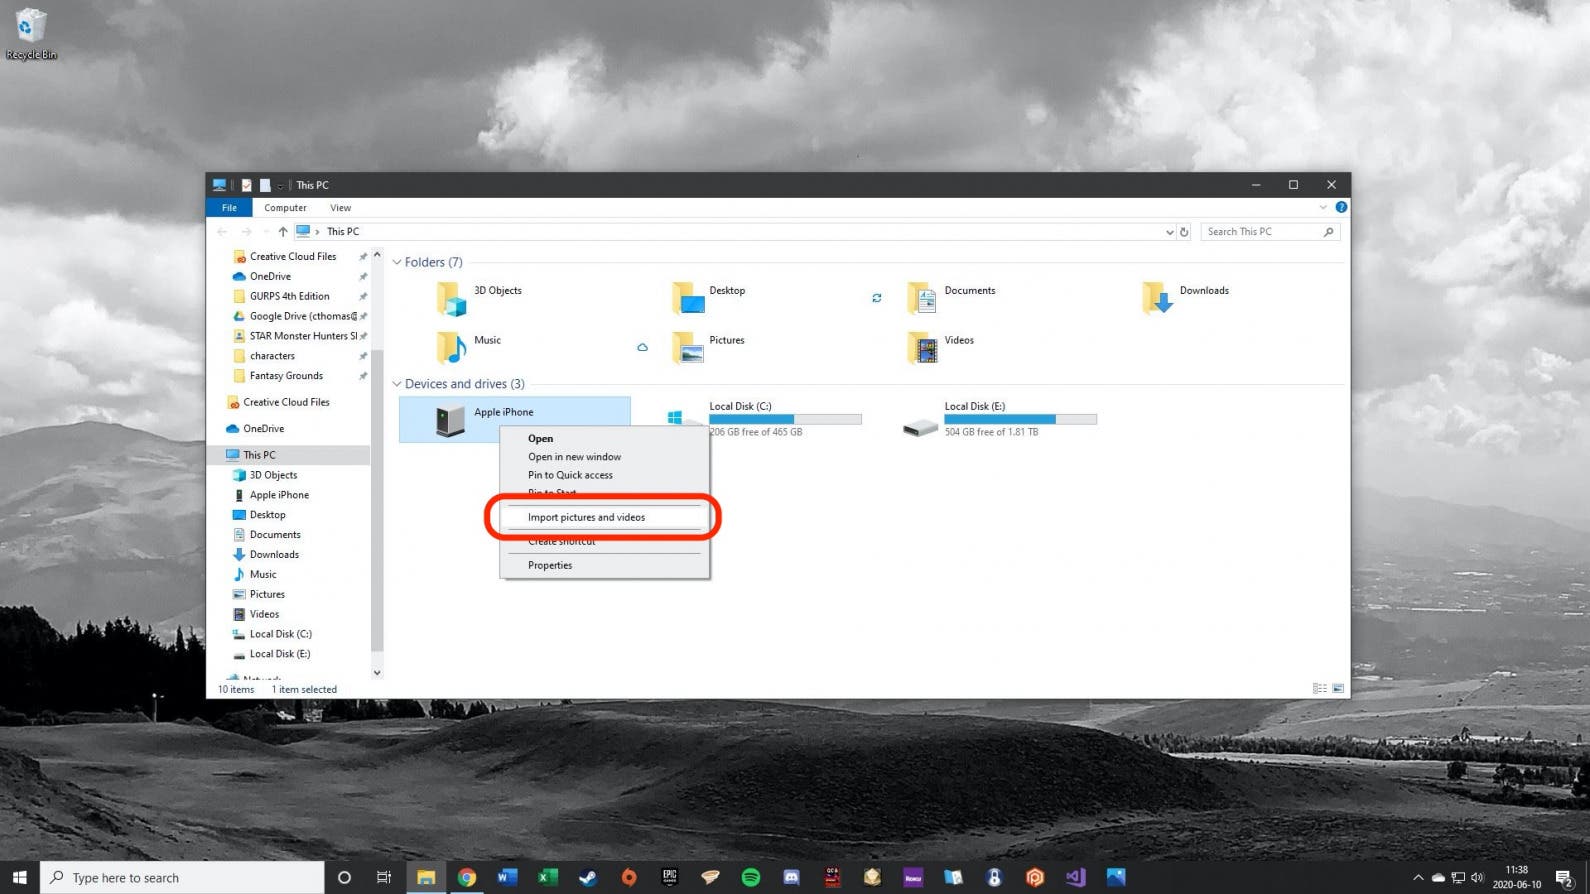
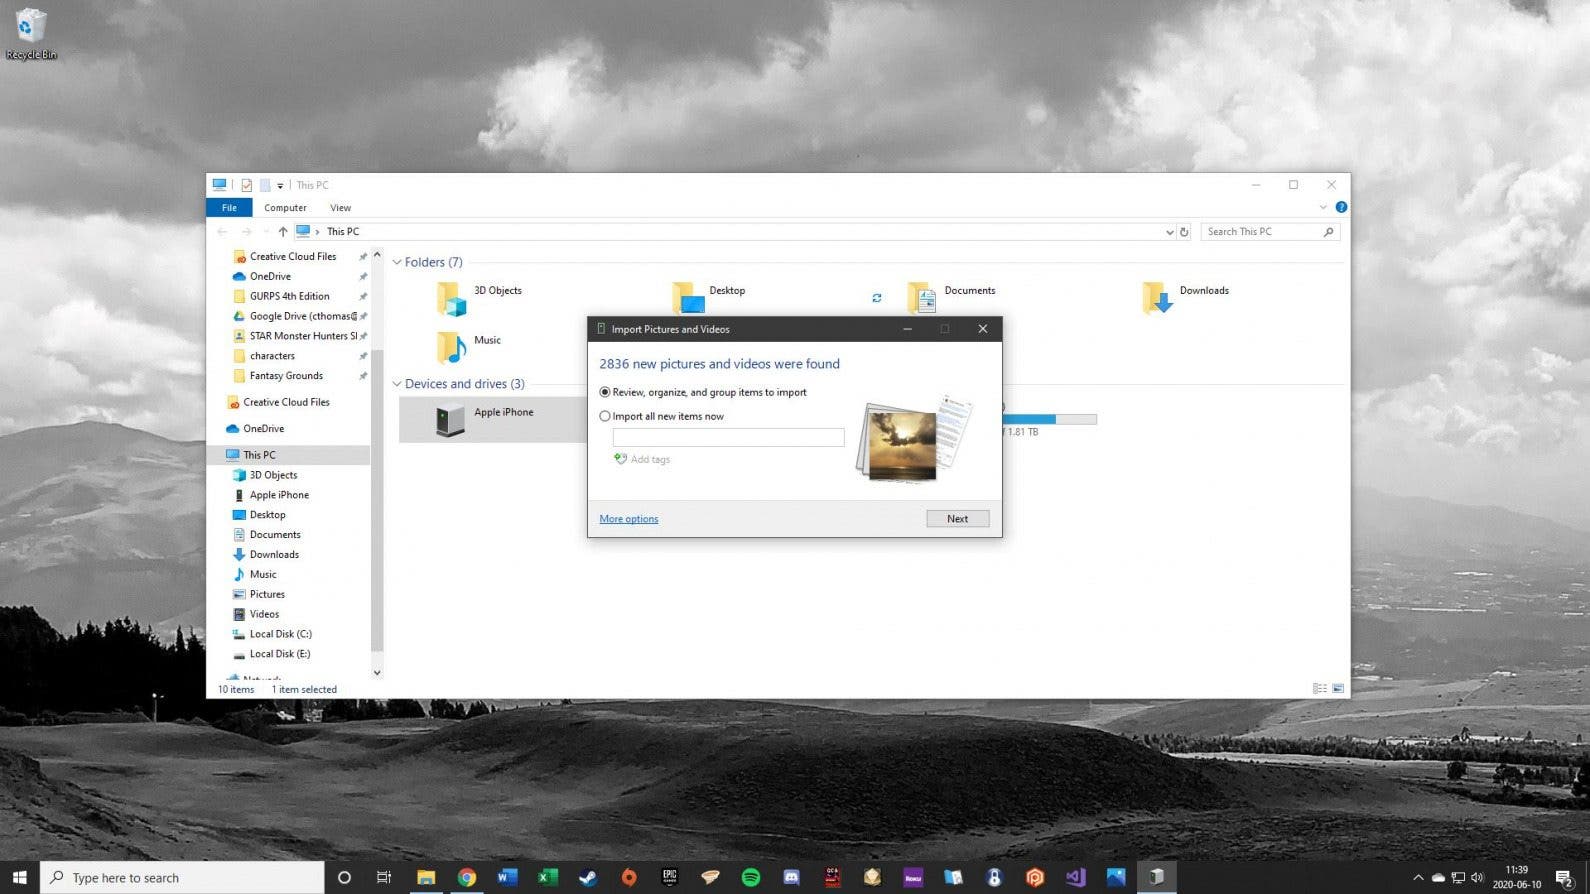
- On your Windows computer navigate to This PC. You should see your iPhone listed nether Devices and Drives.
- Right-click on your iPhone and in the context menu select Import pictures and videos.
- You can either import all new items, or clickReview to organize and group items to import. I recommend selecting Review because the automatic organization may non exist ideal.
- The More than options link at the bottom offers options to change where the files are saved, merely for most users the default Pictures folder is fine.
- Click Side by side and the estimator will scan your iPhone for images and videos.
- In the following window, select the items y'all wish to import.
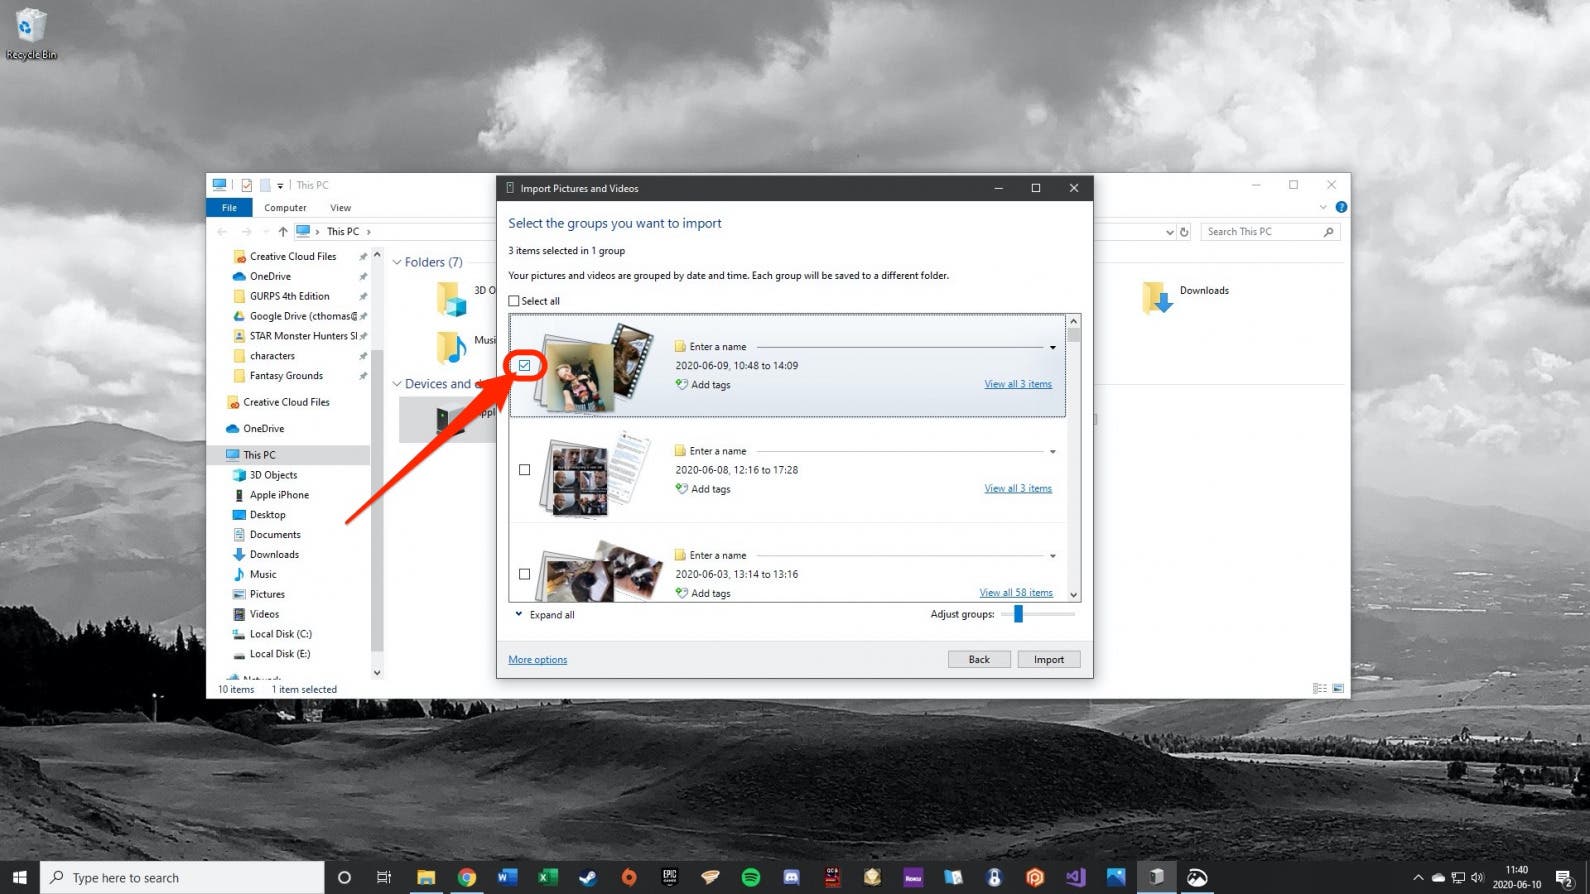
- A slider at the lesser of the carte du jour changes how the images are grouped into folders, e.g. by hr, by hours, past day, past calendar month, or by year taken. You can slide it all the way to the correct to salvage them all in one folder.
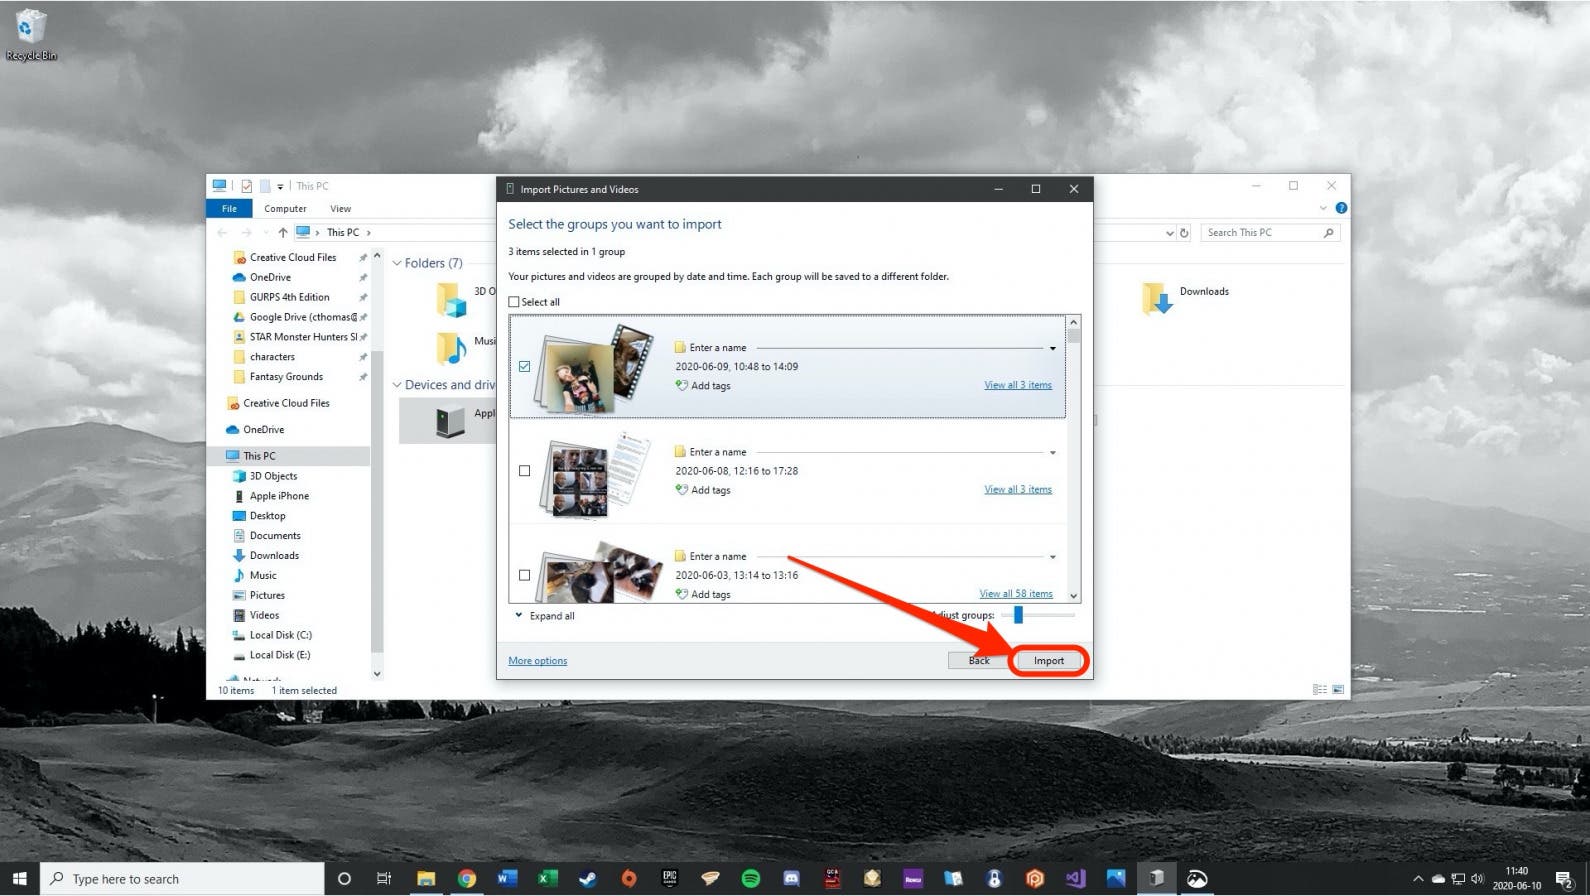
- Click Import when y'all're ready to transfer images.
Side by side, we're going to delve into the two different ways to import pictures from iPhone to Mac with iCloud: Photo Stream and iCloud Photo Library. In that location are some important distinctions between the two that we'll go over; my best recommendation is to enable both.
How to Import Photos from iPhone to MacBook or Mac with iCloud Photo Stream
Photo Stream does not take upwards whatsoever of your iCloud Storage package. However, photos will appear in Photo Stream for only 30 days (we share a solution to this below). Photo Stream also doesn't upload your videos, simply yous can view your pictures beyond your devices easily. For both methods, Photos will automatically transfer when your device is connected to Wi-Fi unless you accept enabled the option to transfer over cellular data. To prepare Photo Stream, you'll demand to enable it on both your iPhone (or iPad) and your Mac.
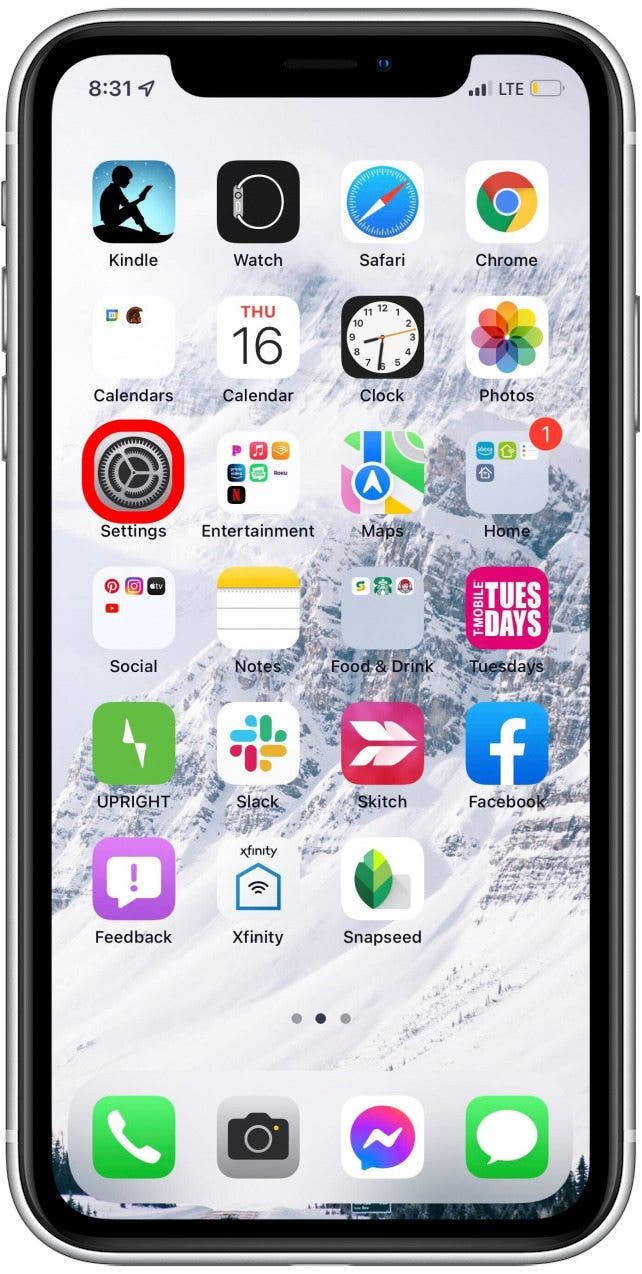
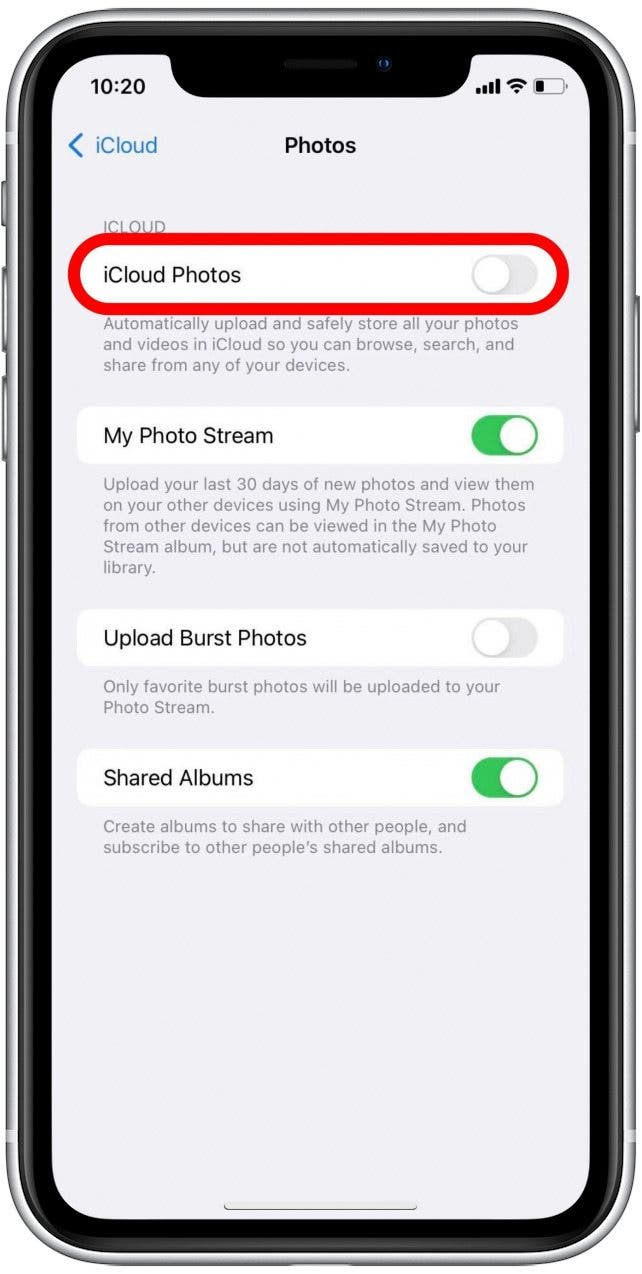
- On your iPhone, open the Settings app.
- Tap your Apple ID profileat the top of the screen.
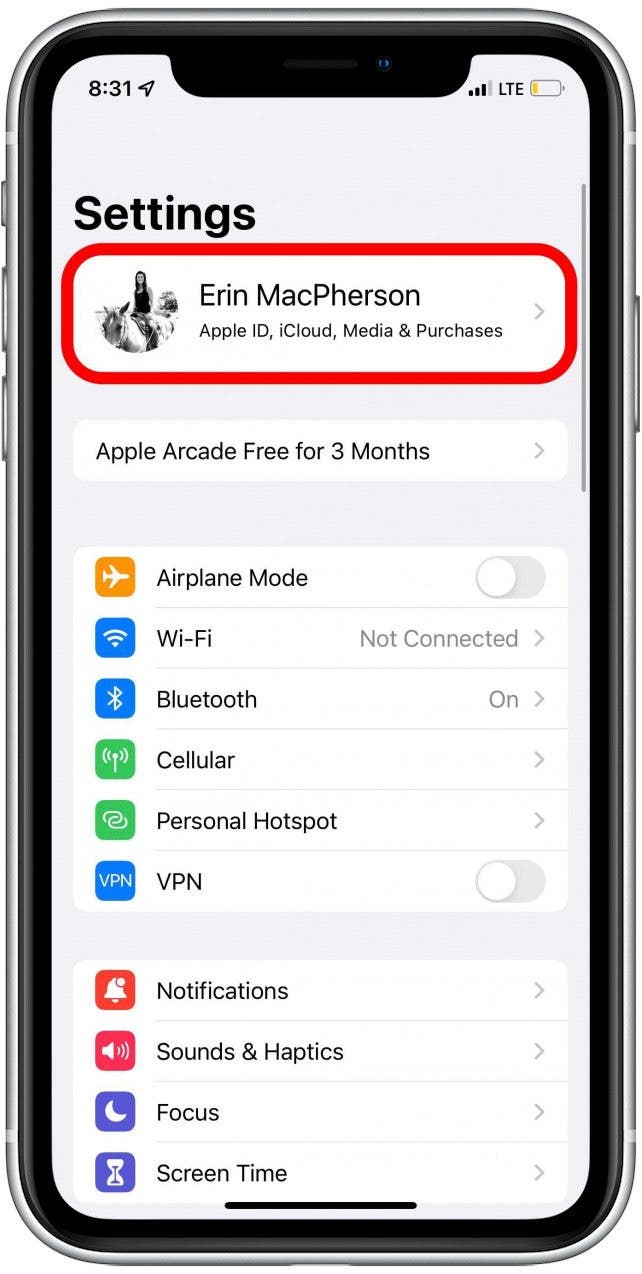
- Tap iCloud.
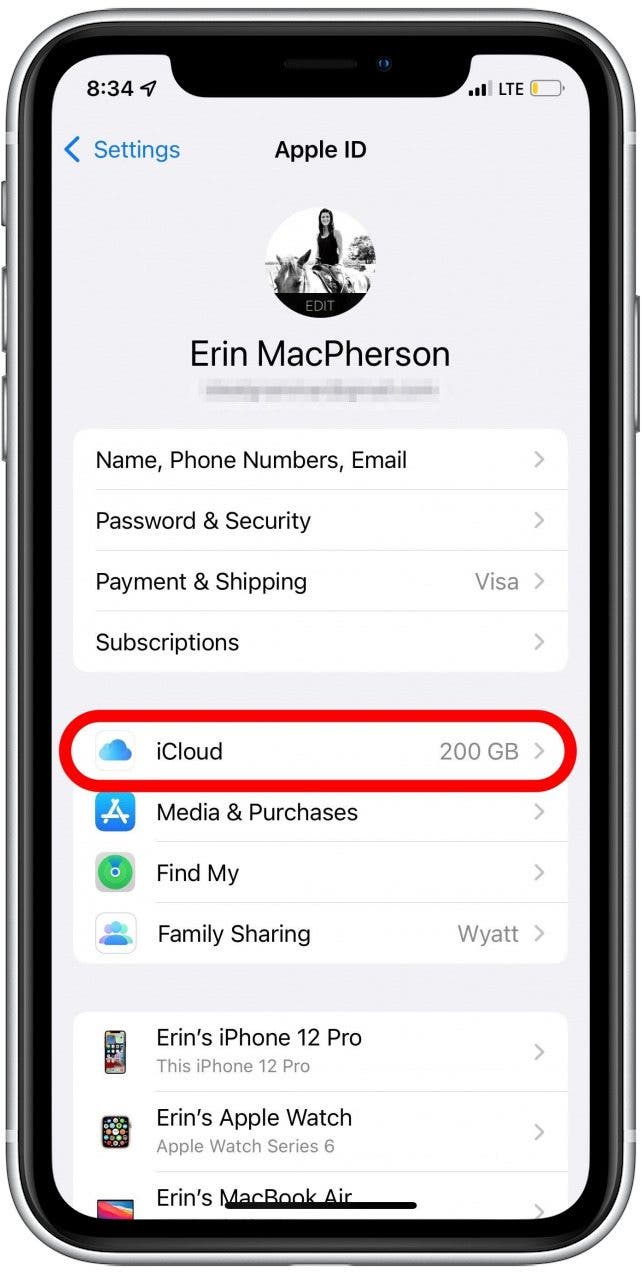
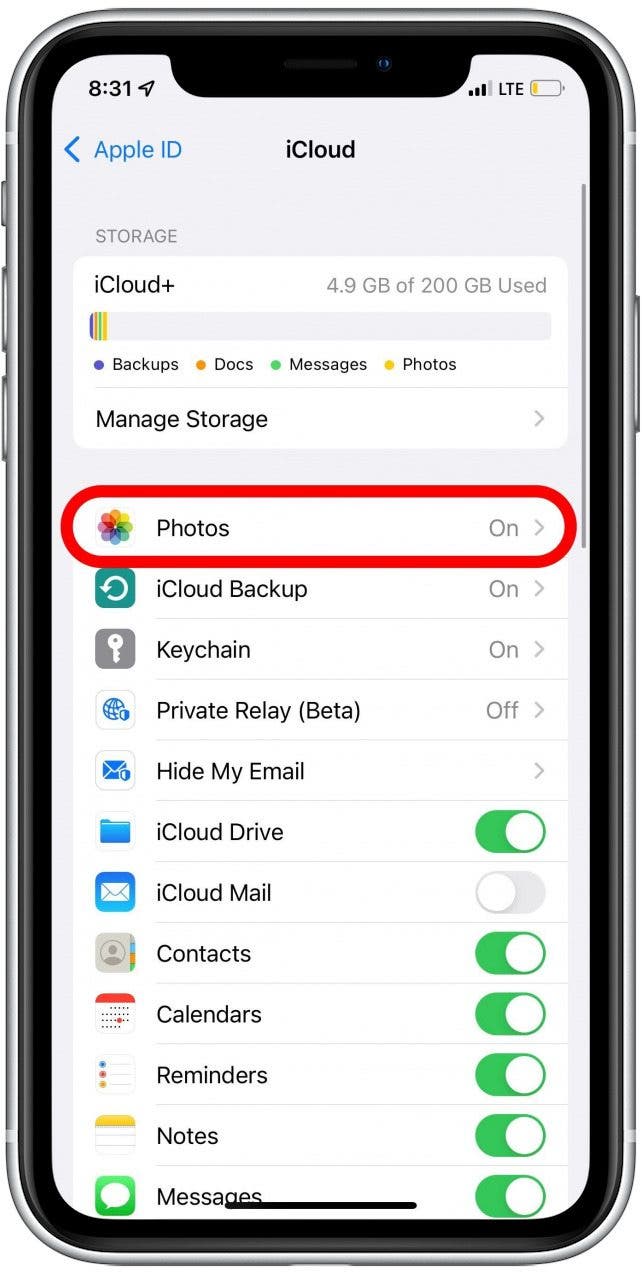
- Cull Photos.
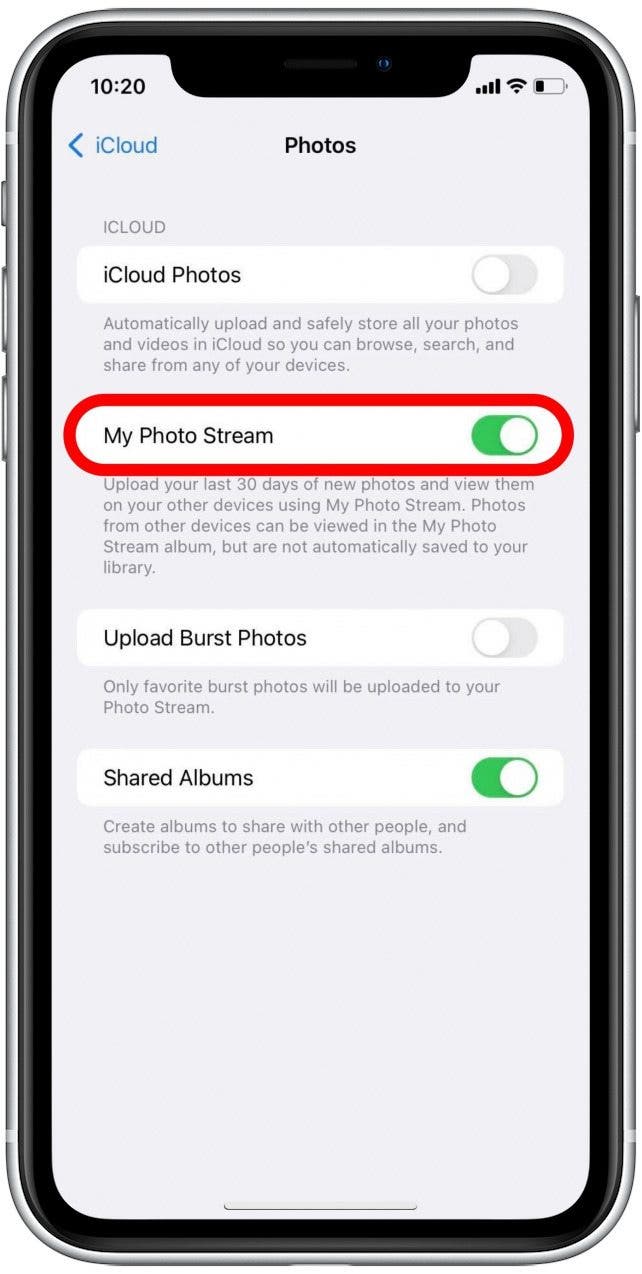
- Toggle on My Photo Stream.
- On your Mac, open thePhotos app. If you're on a PC, download iCloud for Windows before you continue.
- From the Photos menu cull Preferences.
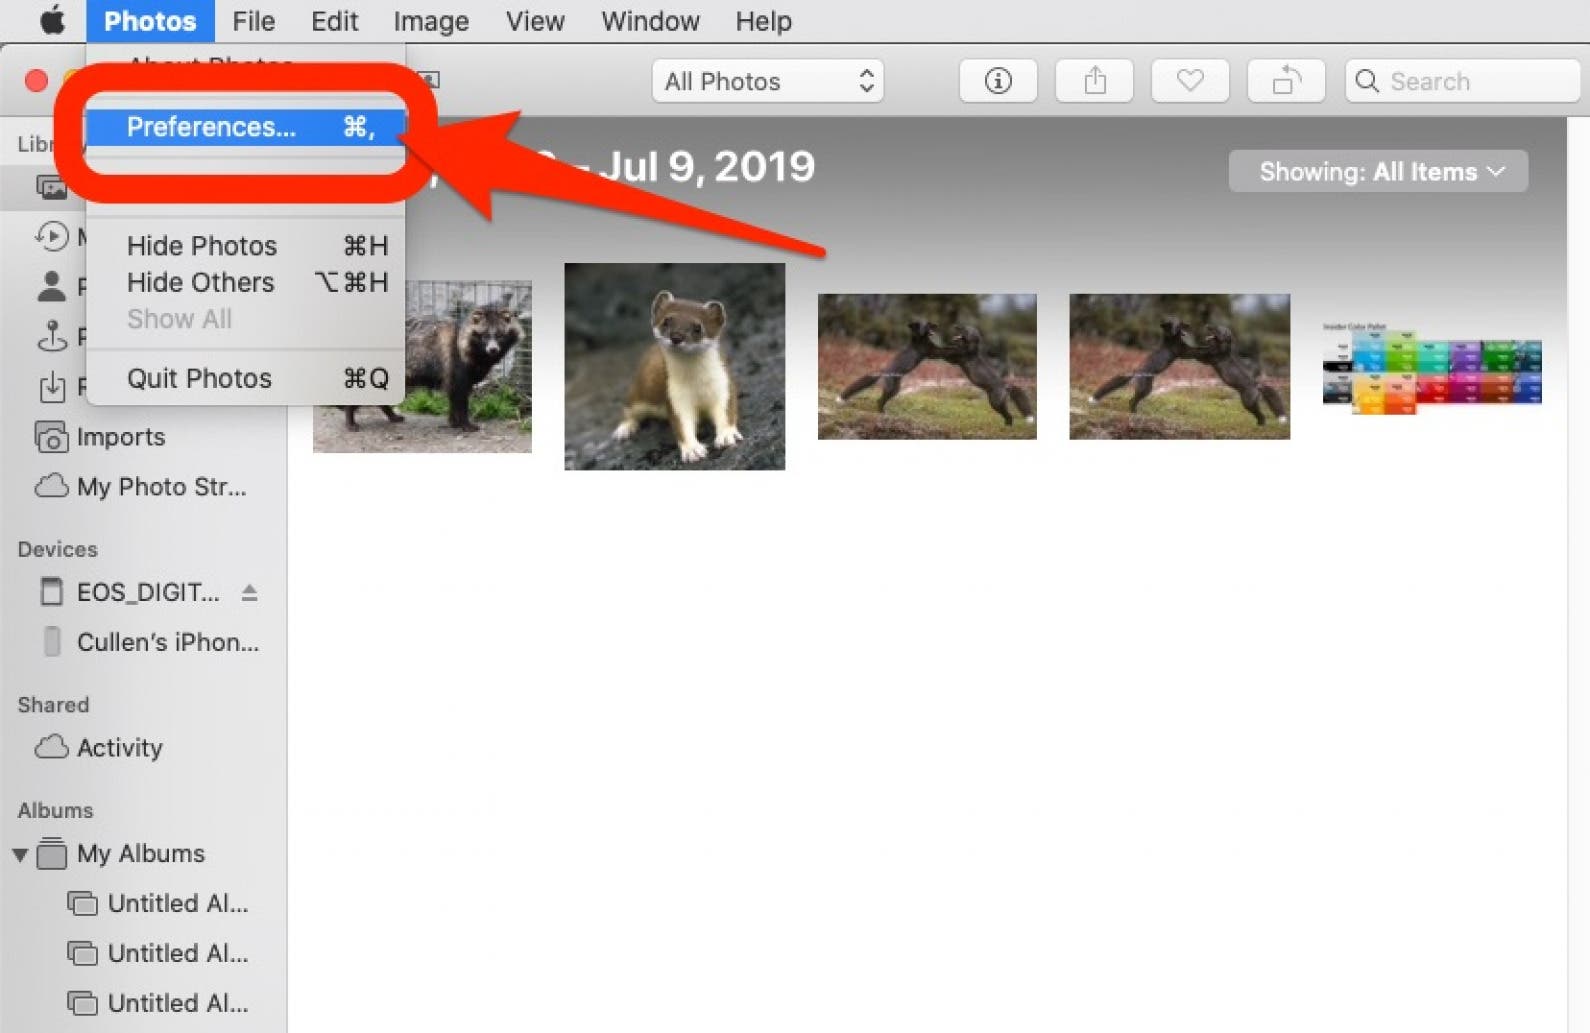
- Choose theiCloudtab.
- Bank check the box next to My Photo Stream. Click Done.
Note: In MacOS Mojave and before the same setting is institute in Arrangement Preferences > iCloud > the Options push side by side to Photos.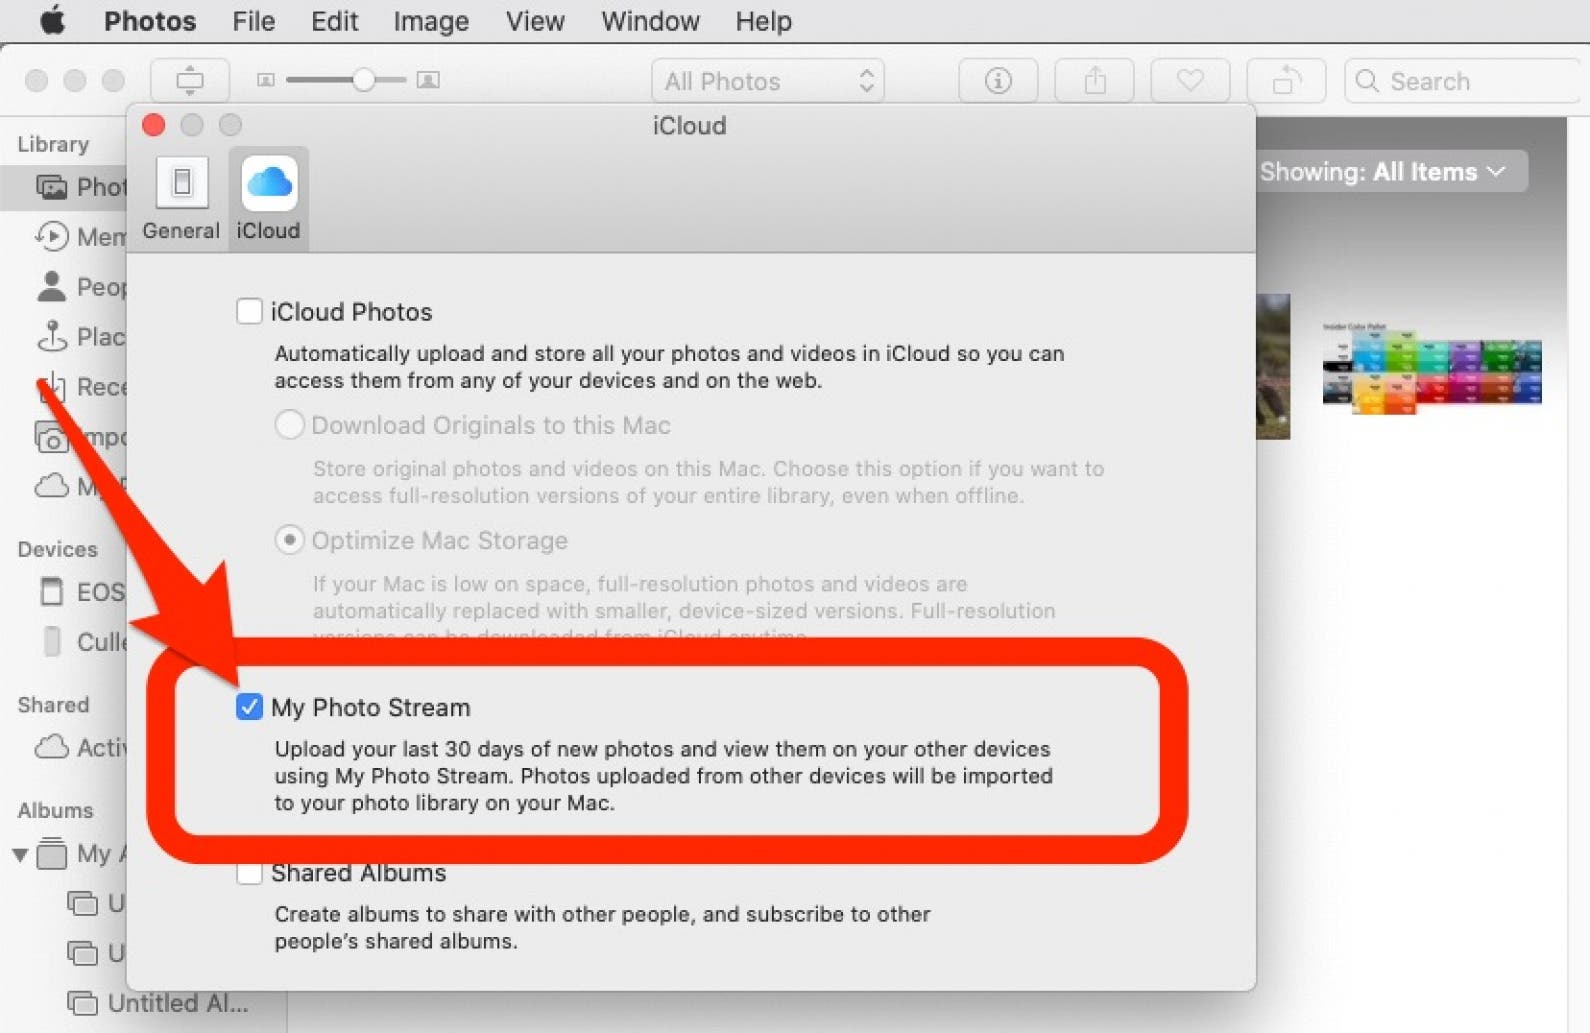
- At present photos will automatically exist added to Photograph Stream when you're in a Wi-Fi zone. But retrieve, pictures remain in Photograph Stream for 30 days or upwardly to grand images.
If y'all feel any bug with your photos iCloud upload, check out these troubleshooting tips.
How to Set Photo Stream Images to Automatically Download to Mac or PC
In MacOS Catalina y'all don't have to do anything special. The Photos app on your Mac automatically saves your Photograph Stream to your photo library.
In MacOS Mojave or earlier, follow these steps:
- Open up the Photos app.
- Select Preferences at the very pinnacle, under Photos.
- Cull Full general.
- Check the box next to Importing: Copy Items to the Photo Library.
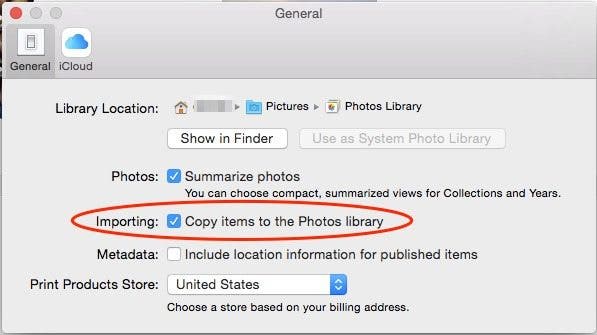
This fashion, even once photos leave your Photograph Stream, they will exist saved to your computer.You can also enable iCloud Photo Library on iPhone and computer if you pay for iCloud storage. Doing so will allow you lot to store your Photos in the Cloud, making them attainable online as well as on your computer.
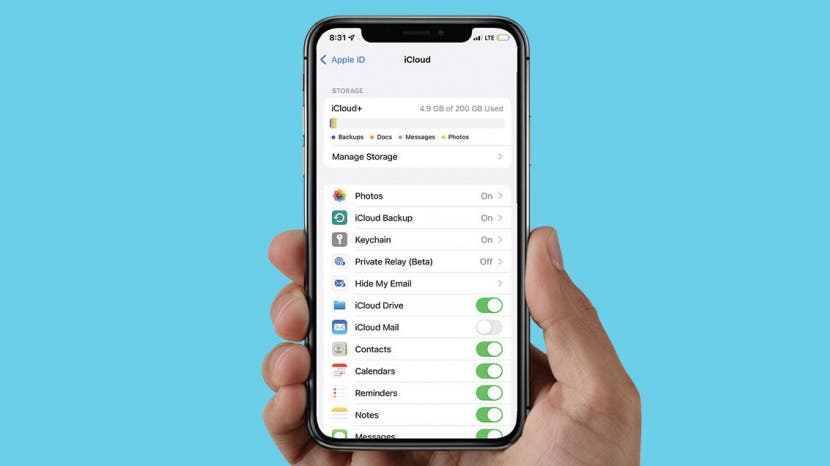
How to Download Pictures from iPhone to Reckoner with iCloud Photos (As well Works on iPad)
The process for setting upward iCloud Photos is like to Photograph Stream. Enabling iCloud Photos will shop all of your photos in your iCloud business relationship, non merely the almost contempo. This can rapidly utilise upward your iCloud storage infinite unless y'all pay Apple tree for more. On the other mitt, your photos from your reckoner and your iPhone volition all be safely backed up in the deject, and the process for how to transfer photos from iPhone to estimator will exist practically effortless, since iCloud volition keep the two libraries in perfect sync.
On your iPhone:
- Open theSettingsapp.
- Select yourApple tree ID contour at the top.
- TapiCloud.
- ChoosePhotos.
- Toggle oniCloud Photos.
On your Mac:
- OpenOrganization Preferences from the Apple menu in the top-left corner of your screen.
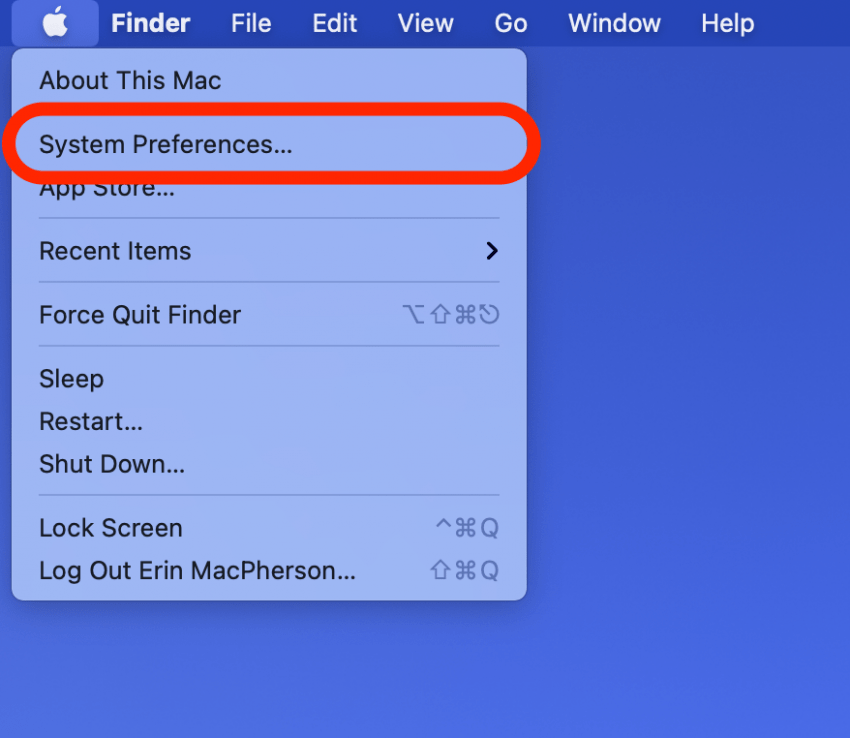
- ChooseApple ID and sign in.
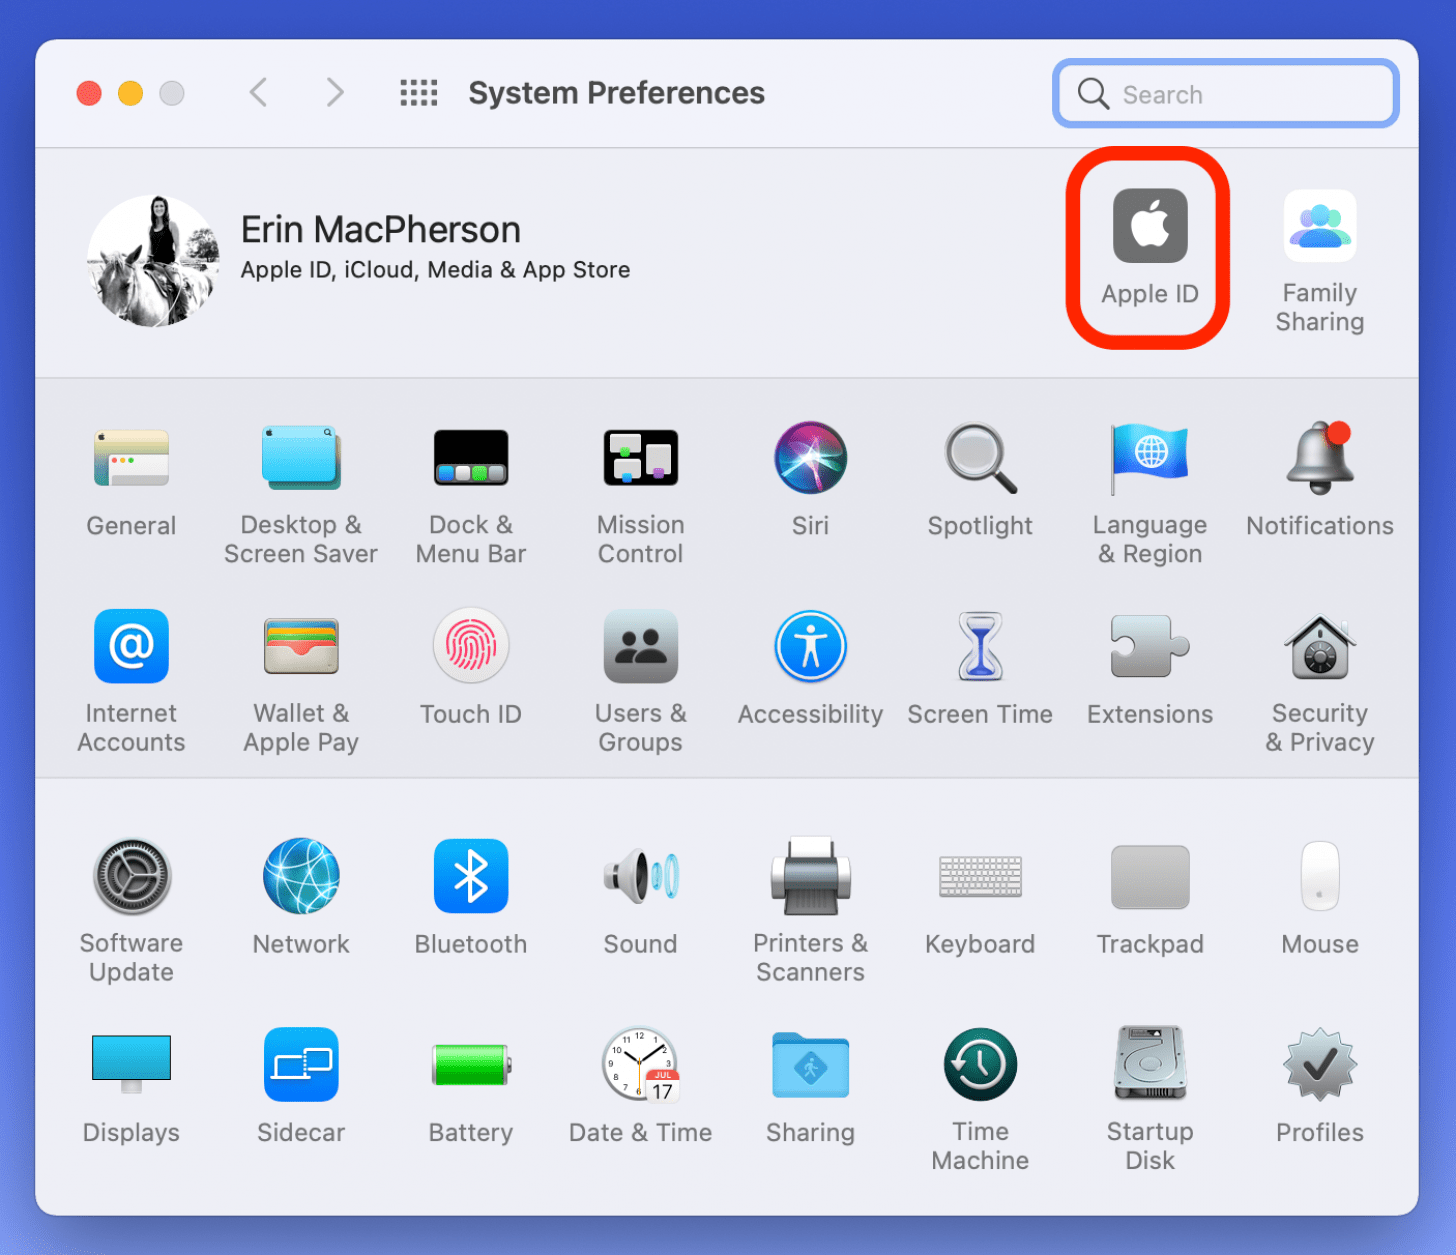
- In the menu on the left, iCloud should already be selected. If information technology's not, click it.
- Check the box adjacent to Photos and enter your computer passcode if asked.
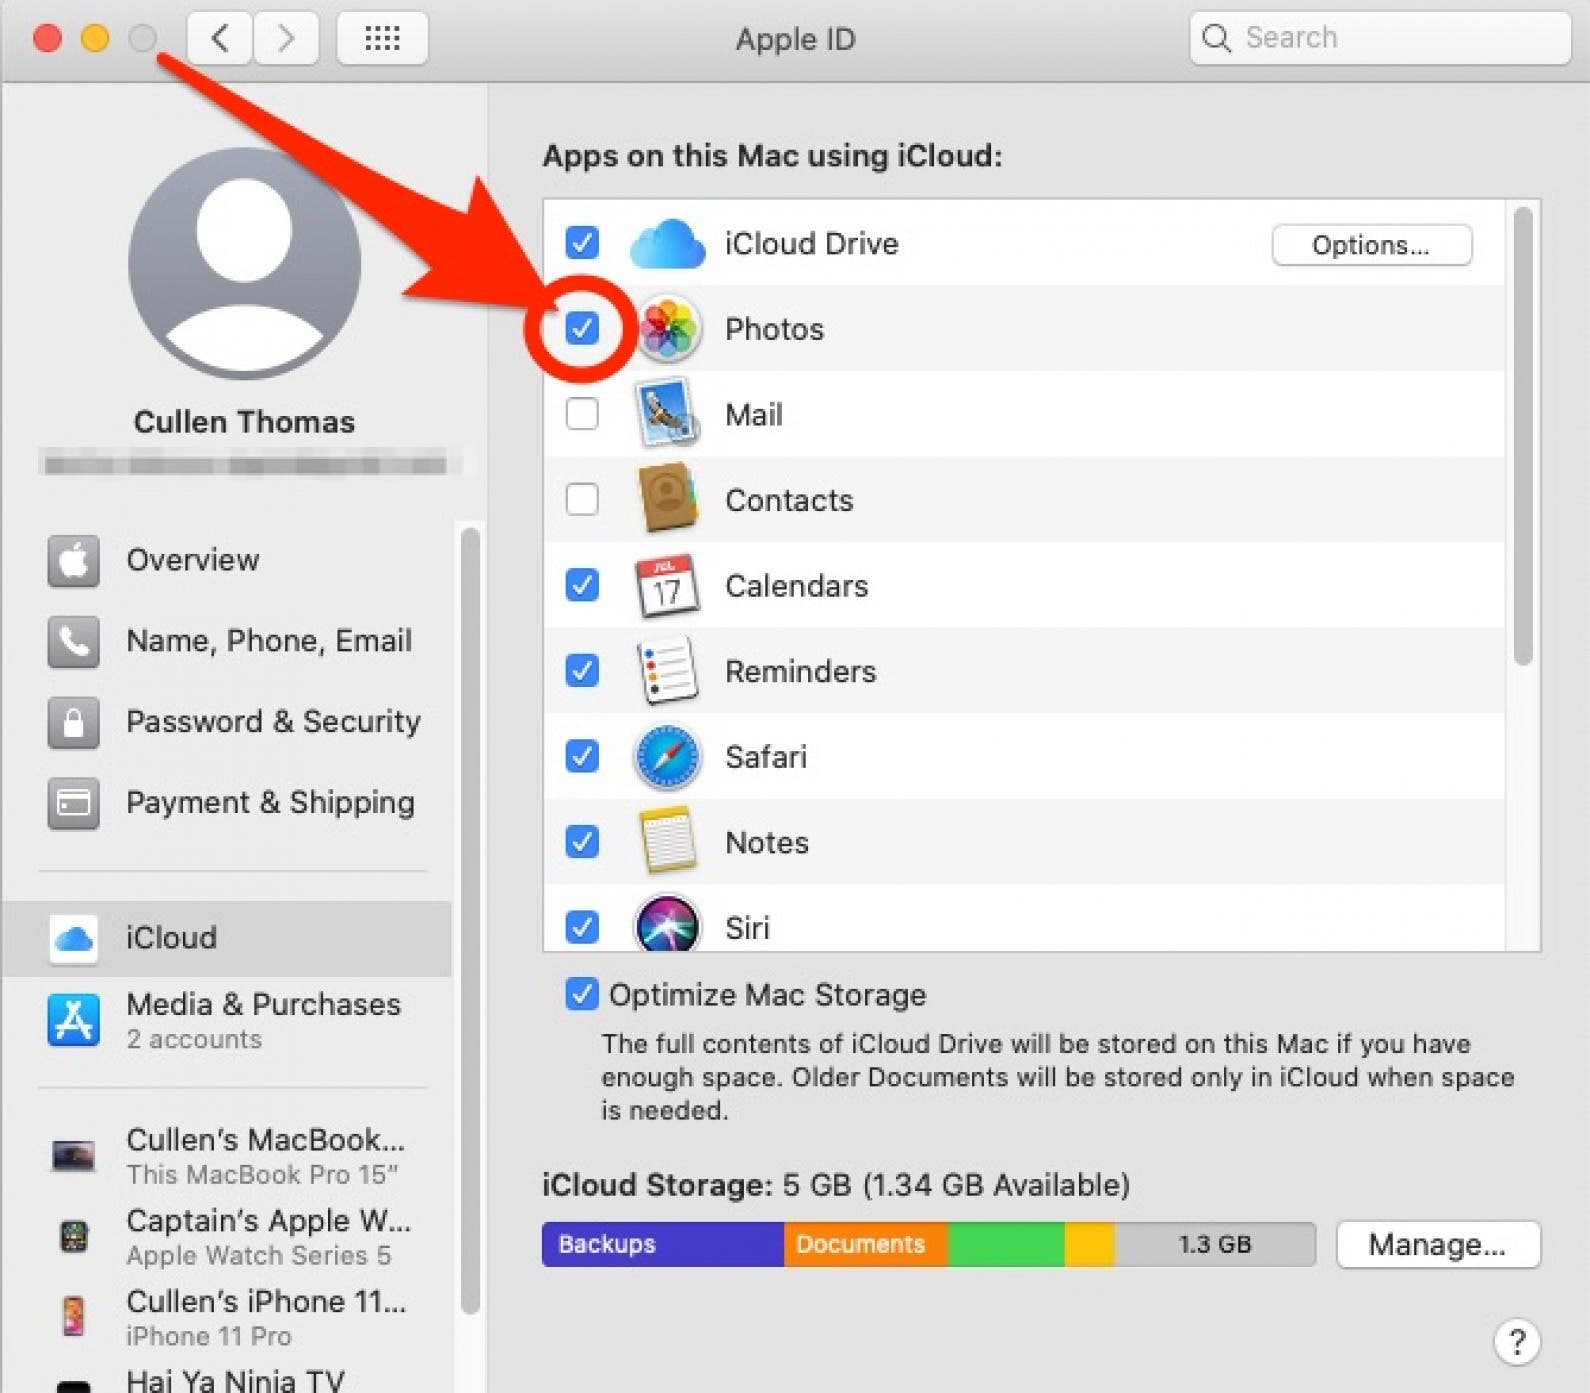
- Now all the photos you take on your iPhone, and all the photos you add on your calculator, will prove up in both places. Go on an heart on your iCloud storage!
How to Download Photos from iPhone to Mac with AirDrop
AirDrop uses Wi-Fi to transfer files from iPhone to Mac and vice versa (and tin be used for other files too), which means offset yous need to be sure both your iPhone or iPad and reckoner are connected to Wi-Fi. Remember that AirDrop also requires a 2012 or after Mac model running Bone X Yosemite or later to transfer photos from iPhone to Mac. To apply AirDrop to export photos from iPhone:
- Open the Photos app on your iPhone.

- Select the photos yous want to transfer to the computer, and so tap the Share icon.
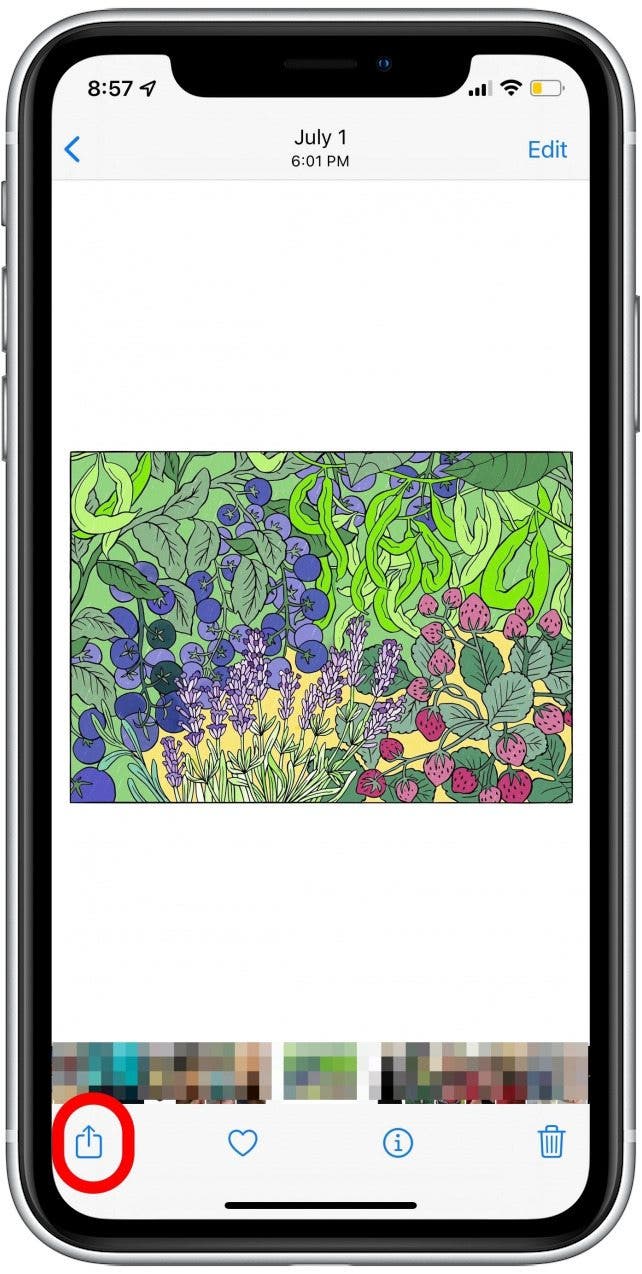
- SelectAirDrop in the Share menu.
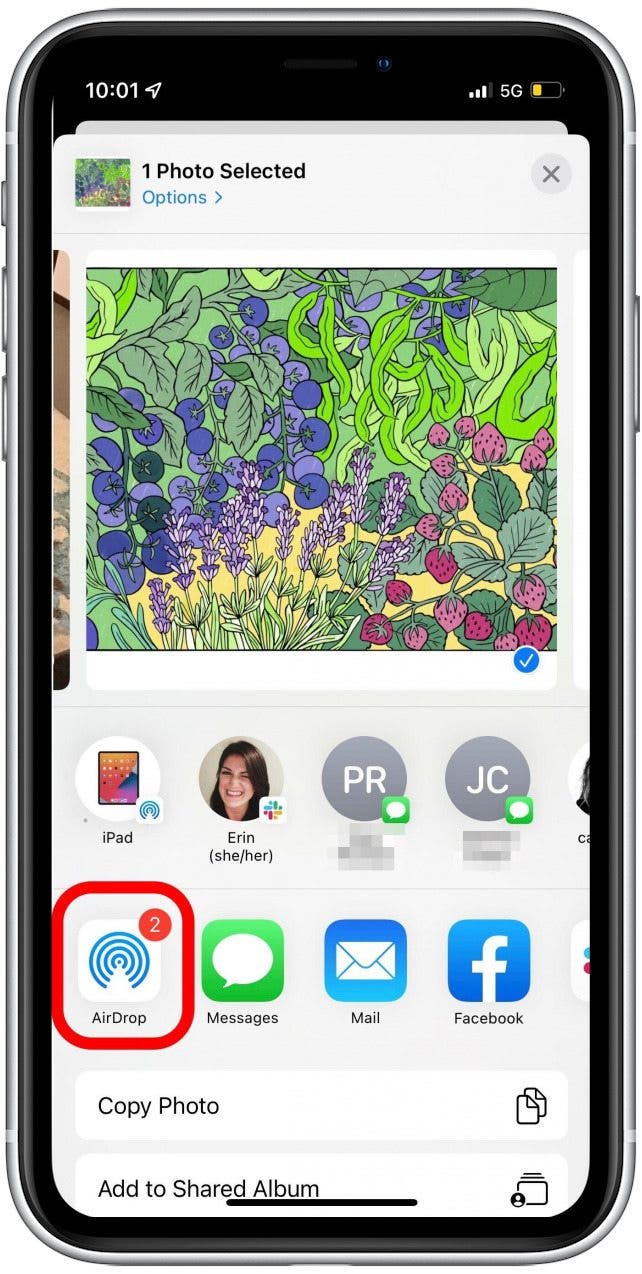
- Choose your computer.

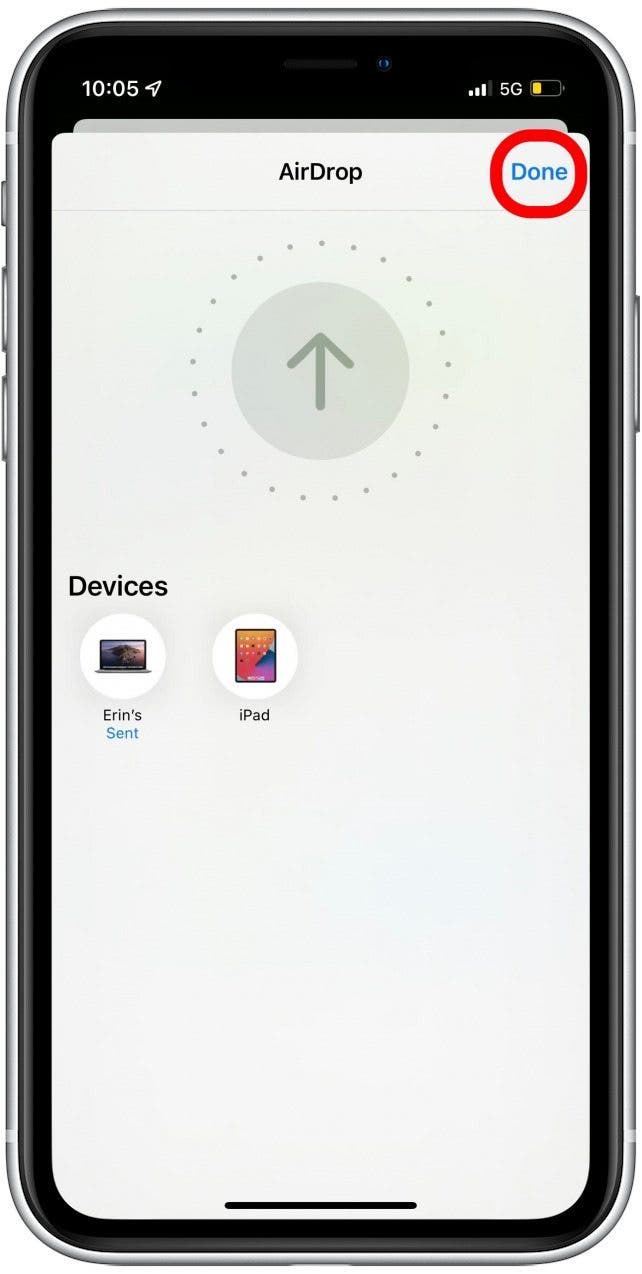
- If successful, information technology volition say Sent below your computer'south icon.
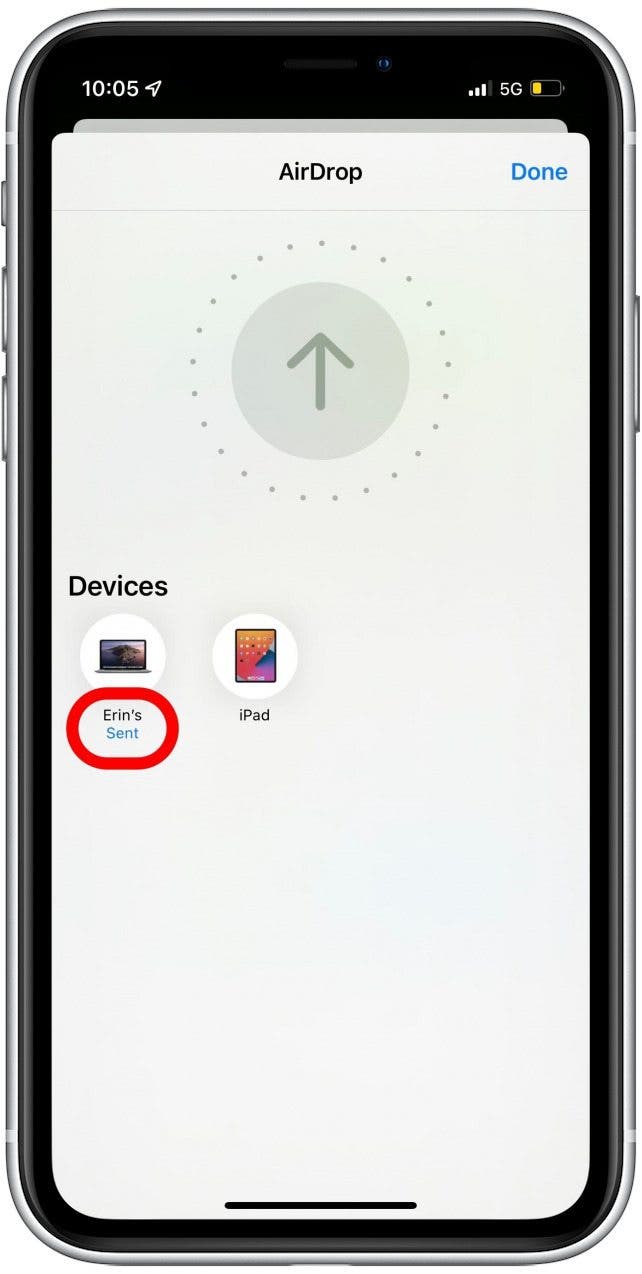
- TapDone in the upper-right corner to go out the AirDrop screen.
- If your computer is not using the same iCloud account as the iPhone y'all are sending files from, you will need to click Salvage when the file arrives on your calculator. If you are using the same iCloud account, the pictures will automatically salve.
Need more methods to download pictures to a computer? Here'south iii more than you can use to transfer photos from iPhone to computer.
Source: https://www.iphonelife.com/tip/how-to-get-photos-off-iphone
Posted by: thalerpappin.blogspot.com
0 Response to "How To Backup Iphone Photos To Pc Windows 10"
Post a Comment