

How To Install Magento In Windows 10
Magento is a powerful eCommerce solution that runs on a Linux environs. If yous are a small business owner or a technical person that wants to endeavor out Magento locally without investing in a whole new operating system, there is a way you can install it on your local machine.
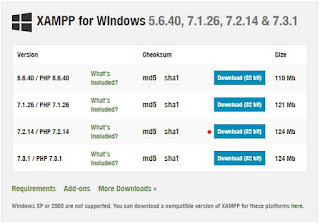
In lodge to install information technology on a local Windows system, yous will need to first download XAMPP. From here y'all will be able to manage the services for the Apache application server besides as the MySQL database. For Magento ii.three.0, it is very of import that y'all download the specific versions mentioned here as you will run into a lot of trouble when it comes to version mismatches.
Step ane: Install XAMPP
Download XAMPP for Windows version 7.2.14
Once the download is complete, execute the file from the Windows environment that you want to install Magento. You may meet the following warning message:
 |
| Just click OK to continue. |
This installation wizard will open. I recommend doing a straight install that includes all of the selected components.
 |
| Click Next > |
Make certain the file location for the installation is C:\xampp. Continue with the installation Wizard until it is complete. Before endmost out of the wizard, make sure the box is checked to open upon finalization.
You will come across the XAMPP Control Panel v3.2.2.
The modules that we are interested in hither will be Apache and MySQL. If you select Outset under Actions for the Apache module, yous may receive an error message in the window below.

- #Listen 20.twenty.20.twenty:80
- Heed 80
- ServerName localhost:fourscore (a bit farther down)
 |
| Click Save and Save. |
- Apache will be your Application Server
- The root is going to exist C:\xampp\htdocs
- PHPMyAdmin volition exist your database tools
Pace 2: Install Magento

- xsl
- intl
- lather
Save the document and close. Restart the Apache and MySQL services.
Stride 3: Create a Database
 |
| Proper name the database Magento and select Collation from the dropdown carte. Click Create. |

Now in the left pane, y'all will see your new database listed.
Step four: Finally, time to Setup Magento
 |
| If you lot get this screen, yous are doing groovy! Click Agree and Setup Magento to go on. |
- Footstep 1 of the Magento Setup is a readiness test. You may receive an error such as:


 |
| Once y'all meet this screen, click the Next button at the top of the page to continue. |
- Stride ii of the Magento setup is to add the database to Magneto.
 |
| We did not set upwards a password for the database so yous tin leave it blank. Database proper name will exist whatever you named it in Footstep 3. Leave the commencement two as is. |
- Step 3 of the Magento setup is the Web Configuration.
 |
| "Magento" in the shop address is the binder that we created in step ii; where we extracted the Magento file that we downloaded. Remember that C:\xampp\htdocs is our root for all intents and purposes. If yous named this folder something else, be certain to employ the same name hither. "Admin" volition actually have several characters afterwards it past default. I have removed them for ease of utilise, but you are welcome to keep it or proper noun information technology something completely something else. |
- Step four of the Magento setup is the Customize Your Store.
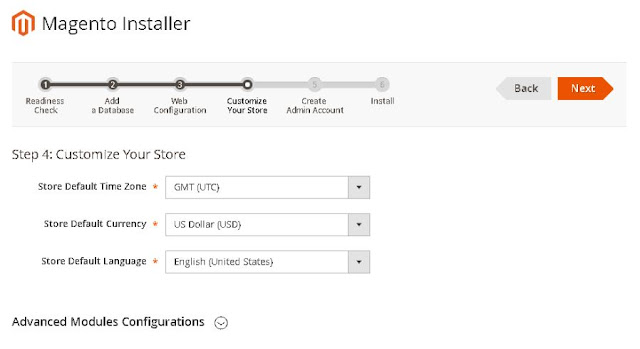 |
| Setup your store defaults. Click Next. |
- Footstep 5 of the Magento Setup is to Create an Admin account for Magento.
 |
| Fill in the data for the Admin business relationship. Click Adjacent. |
- Stride 6 of the Magento Setup is to Install Magento.
 Click Install At present and have a lot of patience. There will exist times when it seems like it isn't doing anything at all. If you are not certain, you tin can open up the panel log below the progress bar and see if it is actually performing whatsoever actions. But be patient.
The start time I ran this, it errored out at 52%. Checking the console log I saw that the error was on Module "magento_Catalog': Non really knowing what to practice, I performed the post-obit:
Uninstalled XAMPP, opted for it to delete the folder once it was installed. Of course, it didn't so I went to the folder in File Explorer and deleted it. And so, I started the whole thing over again making sure to apply a fresh download of the Magento file.
- Magento is successfully installed!

Step five: The Moment of Truth

 |
| Login with the credentials created in Step v of the Magento Setup. |
Step six: Tying up loose ends.
Modifying the Validator.php File
$realPath = $this->fileDriver->getRealPath($path);
Annotate it out with // in front of it like this:
// $realPath = $this -> fileDriver -> getRealPath ( $path );
Below this line, add the following:
$realPath = str_replace ( '\\' , '/' , $this -> fileDriver -> getRealPath ( $path )); //EH0219
Best Practice: I accept placed //EH0219 to document that Elizabeth Huber added this line in February. 2019.
We are telling the system to use a unmarried forward slash instead of a double backslash. This is because Windows does not utilise double backslashes.
Once that is washed, relieve and close the certificate. You are welcome to restart your services and try once again merely you may receive an error bulletin. This is because we need to reindex our Magento modules.
Reindexing Magento Modules
Go back to your XAMPP Control Panel. On the right-hand side, there's a push button with a cmd prompt icon that says Shell.
You lot will detect that it opens a cmd environment in folder C:\xampp. We demand to be in C:\xampp\htdocs\magento. To do this, we volition enter the following:
# cd C:\xampp\htdocs\Magento <press enter>
Now that we are in the correct folder, nosotros will type in the post-obit:
# php bin/magento indexer:reindex <press enter>

In one case that is done, yous may shut the Trounce. Yous are welcome to restart your services and try once more simply y'all may receive yet another fault message.
You lot may need to make i more modification.
Get to File Explorer and navigate to:
C:\xampp\htdocs\Magento\app\etc
Open di.xml with a lawmaking editor and search for:
Comment this line out (by placing // in front end of the line), re-create the full string:
<item name="view_preprocessed" xsi:type="object" >Magento\Framework\App\View\Asset\MaterializationStrategy\Symlink</detail>
Paste this just below this line and alter Symlink to Copy:
<itemname="view_preprocessed"xsi:type="object" >Magento\Framework\App\View\Asset\MaterializationStrategy\Copy </item>
| |
| Will wait like this. |
Save and close the certificate, restart your services and try accessing the website, and admin console once over again. If you are still getting an mistake, go back into this file and remove the // on the Symlink line, and place it on the new line that you lot inverse to "Re-create". I don't know why, but that worked for me.
If you lot know a way to streamline these steps, please let the states know in the comment section. This is simply how I was able to go it upward and running for myself. I hope that it works for you too.
I honestly don't know very much about Linux or PHP. I take usually only worked with Microsoft proprietary applications. My specialty with Magento up until this point has been supporting the integration of Magento to Microsoft Dynamics NAV. In a afterwards post, we will discuss the integration with Microsoft Dynamics NAV and Business Key using the TINX-IT connector.
Source: https://www.navisiontech.com/installing-magento-2-3-0-on-a-local-windows-host/
Posted by: thalerpappin.blogspot.com
0 Response to "How To Install Magento In Windows 10"
Post a Comment